
In this article:
Cisco Secure Access Control System (ACS or CSACS) server is Cisco’s Authentication, Authorization and Accounting (AAA) server, allowing to centralize network devices users permissions and auditing.
It supports TACACS+ (Cisco proprietary) and RADIUS (open standard, usable with non-Cisco devices) protocols. It has its own users store, which is useful for lab tests, but in real life it will most likely be connected to a Microsoft Active Directory server to centralize users credential management.
Note
ACS is in the process of being replaced by its successor Identity Service Engine (ISE).
For some time, the two products were to be used together, with ACS handling authentication and authorization while ISE was focusing on hosts policy-compliance checking.
For CCNA-Security students, as for now only ACS is really covered by the curriculum. ISE is just mentioned from time to time so you know what it is and why it is used.
Evaluation versions of ACS can usually be obtained by contacting your Cisco sales representative.1
Prerequisites
To install an ACS server, you will need the following things:
-
The ACS installation DVD.
This DVD weights around 1GB and contains an heavily modified version of CentOS (by-the-way there is an unofficial patch allowing to get a full-blown Bash shell on your ACS server).
Do not confuse it with the older ACS for Windows disc which weighted around 100 MB. It was used to install an ACS server on a Windows machine, but this version of ACS server is not supported anymore and is now part of history.
-
The ACS license files (*.lic files).
ACS actively checks the hardware while booting and refuses to work in a non-supported environment (either a physical Cisco appliance or a VMware ESXi server).
In theory, this should also work in VMware Player environment as the result should be very close to an ESXi from the guest point-of-view. ACS indeed doesn’t complain, network adapters are correctly recognized, but trying to assign them an IP address has no effect making the whole thing unusable.
In order to have a Cisco ACS server in our lab, we will therefore need2 to use a Qemu virtual machine and modify ACS installation packages to bypass the platform check.
Installation process
Create the blank template node
As stated earlier, the Cisco ACS server actively checks that the platforms on which it is running matches the officially supported platforms. In order to install it under Qemu, you therefore need to modify the Cisco ACS installation image to remove this check:
- The operation can be done manually, but it is quite complex.
- If you are lucky, you may find already modified unofficial ISO images floating around (*_any_server.iso files).
The installation itself is straightforward. In GNS3, go in Edit > Preferences to open the Preferences screen, then create a new QEMU virtual machine with the following properties:
- RAM: 4096 MB
- Disk image (hda): Create a new one, set its size to 60 000 MiB.
Once the template device has been created, edit its settings:
- General tab:
- Symbol: set it to access_server
- Category: Security devices
- RAM: 4096 MB
- vCPUs: 2
- CD/DVD tab:
- Locate your ACS installation DVD image, there is no need to copy it as it will be used only for the installation.
- Advanced
- Use as linked base VM: NO (we will re-enable this after the installation, more information on linked base VMs).
Install the ACS server
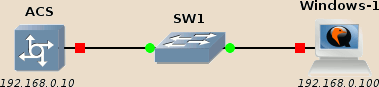
Create the new topology below, using a GNS3 basic switch to connect your newly created device with a Windows guest we will use as management host.

Start the ACS device, open its console and type 2 followed by the Entrer
key to start the installation.
Note
What is this mysterious “2”?
Depending on your environment, Grub boot menu may not be visible on your console so you are actually blindly choosing Grub’s second menu option.
Here is the actual Grub boot menu:
Available boot options:

  [1] Cisco Secure ACS 5.2 Installation (Keyboard/Monitor)
  [2] Cisco Secure ACS 5.2 Installation (Serial/Console)
  [3] Reset Administrator Password (Keyboard/Monitor)
  [4] Reset Administrator Password (Serial Console)
  <Enter> Boot from hard disk
Selecting 2 thus allows to start the installation using the serial console.
You can enable the monitor by editing the device settings and switching the Console type to vnc and removing -nographic from the Options under the Advanced tab, but you may then encounter keyboard layout issues (ACS only supports the US keyboard layout) and you will not be able to copy-paste the terminal content.
It is also worth noting the presence of the Administrator password reset utilities, as attempting to directly change his password from the /etc/shadow file won’t work (the content of this file is automatically overwritten during each boot from the ACS internal users database).
The installation process first copies the operating system files to the hard-disk, reboots, then ask for a few settings and at last install the ACS application (don’t worry if you do not have a valid gateway of name server to provide: just give it some random IP address).
After the last install round, the ACS will finally restart. Be aware that this restart may take a very long time (expect something like a dozen of minutes).
Note
Randomly, the “acs login:” prompt may appear right at the beginning of the booting sequence and seem frozen: this is normal, be patient, a new prompt appears once ACS has effectively started.
If everything went normally, at the end of this starting sequence you should get a login prompt allowing you to login.
Login as admin, then shutdown ACS using the halt command, accept to save
the configuration:
acs/admin# halt
Do you want to save the current configuration ? (yes/no) [yes] ?
Generating configuration...
Saved the running configuration to startup successfully
Continue with shutdown? [y/n] y

Broadcast message from root (ttyS0) (Sun Aug 27 15:58:48 2017):

The system is going down for system halt NOW!
Note
Cleanly shutting down the ACS server is only possible this way.
Previous versions of the ACS server used to provide this functionality also from the web interface but this has now been removed.
Update ACS server files
Depending on the installation media you used, you may have to replace some files after the installation and before using the ACS server. Check any accompanying documentation and ReadMe files. The most universal and safe way to do this is to use libguestfs tools. These tools allow you to access the content of virtual machine hard-disk image, it supports various image formats and mitigation measures against malicious disk images.
If you do not have installed them yet, you should find them in your package repository. To install libguestfs tools on Debian, use:
sudo aptitude install libguestfs-tools
The example command below modifies the ACS-hda.qcow disk image and replaces the file flexlm-10.9.jar located in the ACS server Apache Tomcat libraries with one located on the host system:
virt-copy-in -a ~/GNS3/images/QEMU/ACS-hda.qcow2 ./flexlm-10.9.jar \
    /opt/CSCOacs/mgmt/apache-tomcat-6.0.18/lib
Warning
Always double-check that the device is fully shut down before modifying its hard-disk image!
A concurrent write access to the disk image of a running virtual machine nearly certainly means an irremediable corruption of the image.
Prepare the Windows management host
If you haven’t copied the ACS license file into you Windows host yet, this is now the time to do it. A convenient way to transfer them to your lab guests is to put them in an ISO image which will be mounted by the guest.
I use genisoimage to generate such images.
If it not already installed in your environment, install it (the exact
command depends on your distribution):
1 | sudo aptitude install genisoimage |
Use the following command to create an ISO image containing all *.lic files:
1 | genisoimage -JR -o licences.iso *.lic |
Edit your Windows device settings, mount this ISO file in the CD-ROM drive, and start your Windows host.
ACS server configuration
Start the ACS server. As previously: open its console, and be patient for the login prompt to appear.
Once started, thee ACS server should be pingable from the Windows host.
If this is not the case from the EXEC prompt use the show interfaces command
to check the network settings.
To modify the network settings:
acs/admin# conf t
Enter configuration commands, one per line.  End with CNTL/Z.
acs/admin(config)# int gi 0
acs/admin(config-GigabitEthernet)# ip add 192.168.0.1 255.255.255.0

Changing the hostname or IP may result in undesired side effects,
such as installed application(s) being restarted.
Are you sure you want to proceed? [y/n] y
[truncated]
acs/admin(config-GigabitEthernet)# exit
acs/admin(config)# exit
acs/admin#
Note
You must type int gi 0 even if the interface shows-up as eth0 in the
output of show interfaces.
As always, don’t ask me why, ask Cisco…
To check if all services are correctly started:
acs/admin# show application status acs

ACS role: PRIMARY

Process 'database'                  running
Process 'management'                running
Process 'runtime'                   running
Process 'view-database'             running
Process 'view-jobmanager'           running
Process 'view-alertmanager'         running
Process 'view-collector'            running
Process 'view-logprocessor'         running

acs/admin#
To make changes persistent across reboots, use:
acs/admin# copy run start
Generating configuration...
acs/admin#
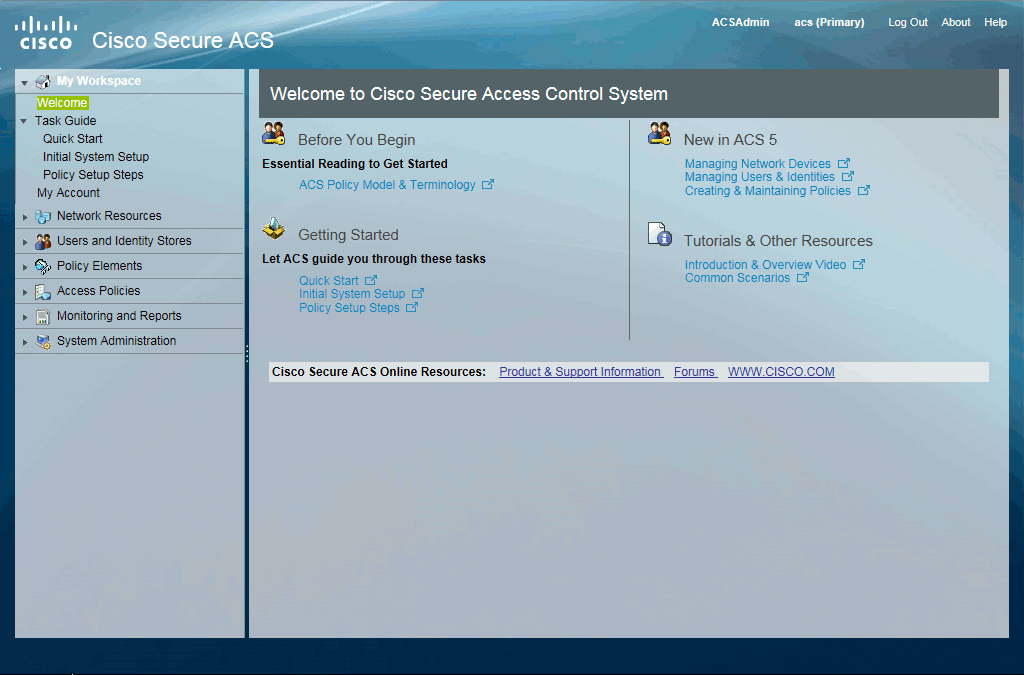
On the Windows host, open a browser and access ACS web interface through HTTPS (https://192.168.0.10).
The ACS default account is ACSAdmin with the literal string default as password (the CLI and Web interface administrator accounts are unrelated):
| Interface | Login | Password |
|---|---|---|
| CLI (console) | admin | Set during the installation. |
| Web (administration) | ACSAdmin | default |
On the first access to the web interface, you will have to change the default password and upload your license files.
When accessing the ACS web interface from Internet Explorer 11, the Compatibility view mode must be enabled otherwise some pages won’t work (for instance Access Policies > Access Services > Default Device Admin > Authorization). Press the Alt key, the Compatbility view option should be available below the Tools toolbar option, add the ACS server address to the list.

Post-install
Now that the installation is complete, don’t forget to modify the following settings in the ACS template device:
- CD/DVD tab:
- Image: set it blank, otherwise ACS devices may refuse to start when you move or rename the ISO file.
- Advanced settings:
- Use as a linked base VM: Yes.
-
Am I aware that a large number of CCNA Security students do not have a “Cisco sales representative”? Yes, but Cisco do not seem to care. Having access to an ACS server is mandatory to get your exam, you’re on your own to figure out how to get one… ↩
-
Note that ESXi can be freely downloaded from Cisco website, so this “need” is merely a consequence of the choices you made when building your virtual lab. More information. ↩