
In this article:
The Cisco Adaptative Security Appliance (ASA) is Cisco’s main firewall and network security product. It mainly provides firewall and VPN services, but its native features can be enhanced with the addition of FirePOWER NGIDS services on top of it.
Note
Even when used on top of an ASA in the same appliance, the FirePOWER NGIDS is never really merged within the ASA but stays a separate module. For instance, the ASA and the FirePOWER each have their own separate CLI shell, each with their own different syntax and logic. In fact FirePOWER is not a Cisco development but has been acquired when Cisco merged with SourceFire, hence the (personal) feeling of an “alien” product plugged into the ASA.
For CCNA Security students, while you must know ASA and be comfortable with its usage, as for now you only need to know what FirePOWER is and why it is used.
Cisco ASA can be obtained from various channels:
-
Cisco ASA entry-level devices target SOHO market and can be bought second-hand for a few dozen of dollars, and brand new for a few hundreds.
-
Like with the IOS devices, it is possible to extract the required files from an ASA device to use them in a virtualized environment. As far as the CCNA Security curriculum is concerned, even old images are enough for your studies. Being real ASA images, they provide the same functionality and react the same way as real ASA appliances (including vulnerabilities).
-
For training purposes, Cisco’s network simulator VIRL provides ASAv, an ASA simulator. However, as with any simulator, it may not offer the same features (last time I checked for instance failover was not supported) or react the same way than real gear.
The GNS3 simulator doesn’t recommend using ASA images but advise to use ASAv instead. Personally I did not encounter any issue with the ASA images, but that’s most probably because I was satisfied with a old image (ASA 8.4.2) and basic features. These a enough for a CCNA Security training.
Prerequisites
To install ASA you will need the:
-
ASA itself, depending on the version you chose:
- real ASA: you need its Linux kernel (asa842-vmlinuz for instance) and Initial RAM disk (asa842-initrd.gz for instance) files.
- ASAv emulator: it usually comes as a virtual machine file, such as asav9*.qcow2.
-
ASDM: this is ASA GUI, coming as a file such as asdm-7*.bin. Be sure to check that the version of ASDM and ASA you are using are compatible.
-
A Windows host or virtual machine to administrate the ASA server.
-
Java must be installed on the Windows host.
-
A TFTP server for Windows (such as tftpd32, a portable edition is available which does not require installation on the host).
Setting up an ASA server requires three steps:
- Booting ASA.
- Configuring ASA.
- Copy ASDM onto the ASA server.
Installation process
Booting ASA
ASA 8.4
Setting-up ASA in GNS3 is described by Anthony Sequeira in this video, in particular from the fourth minute onward. While this video relies on a old version of GNS3, the process remains similar:
- From GNS3 toolbar, go in Edit > Preferences to open the Preferences window.
- In the QEMU > Qemu VMs section, click the New button to create a new virtual machine.
- Be sure to tick the This is a legacy ASA VM checkbox. GNS3 may display a warning recommending to use ASAv instead, but this is fine (see my comment above on this subject).
- Keep the default value for the RAM amount and console type, when requested about the disk image choose to generate a new disk image. GNS3 should display a Create button to create the image directly from within GNS3. Here again, default values are fine.
- Select the location of your ASA kernel and Initial RAM disk files.
- Once the device template is created, go in its settings and, under the Advanced tab, uncheck the Use as a linked base VM (we will check this option back once the installation is ended, more information on linked base VMs).
ASAv
Valerian Ceaus made a nice article about on running ASAv in GNS3.
You need to follow those steps:
- Define a new Qemu VM, but this time leave This is a legacy ASA VM unchecked to create a standard Qemu virtual machine.
- RAM: 2048 MB
- Console type: vnc
- Disk image: Browse to your ASAv image file.
- Edit the properties of the newly created virtual machine:
- General settings
- Symbol: asa
- Category: Security devices
- RAM: 2048 MB
- Console type: vnc
- Network:
- Adapters: 4
- Advanced settings
- Optimizations
- Activate CPU throttling: YES
- Percentage of CPU allowed: 80 %
- Additional settings
- Options =
-cpu Haswell -smp 4,sockets=4,cores=1,threads=1 -k fr(personalize-k fr) to whatever your keyboard layout is, available layouts are usually stored below the /usr/share/qemu/keymaps/ directory). - Use as a linked base VM: NO (we will re-enable it at the end of the installation process, more information on linked base VMs).
- Options =
- Optimizations
- General settings
ASAv devices use VNC console by default. If you prefer to switch to a serial (“telnet” from GNS3 point-of-view) console, Valerian already gives some information but you may want to read this GNS3 forum thread.
ASA initial configuration
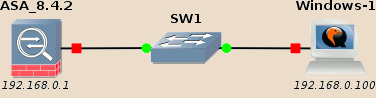
Create a new topolgy and use a standard GNS3 switch to link your ASA device with a Windows host you will use to manage it.

Start the ASA device.
Once it has booted, use enable to switch into EXEC mode.
The password to enable EXEC mode is empty by default (just press Enter when
requested for a password).
Available network interfaces should usually bear a name such as GigabitEthernet 0 or Management0/0. The command to check available network interfaces is the same as on IOS devices:
ciscoasa# show interface ip brief
Interface                  IP-Address      OK? Method Status                Protocol
GigabitEthernet0           unassigned      YES unset  administratively down up
GigabitEthernet1           unassigned      YES unset  administratively down up
GigabitEthernet2           unassigned      YES unset  administratively down up
GigabitEthernet3           unassigned      YES unset  administratively down up
ciscoasa#
Use the commands below to configure the network interface linking toward the
Windows management host (on ASAv use int gi 0/0 to configure the first
network interface):
ciscoasa# conf t
ciscoasa(config)#

***************************** NOTICE *****************************

Help to improve the ASA platform by enabling anonymous reporting,
which allows Cisco to securely receive minimal error and health
information from the device. To learn more about this feature,
please visit: http://www.cisco.com/go/smartcall

Would you like to enable anonymous error reporting to help improve
the product? [Y]es, [N]o, [A]sk later: n

In the future, if you would like to enable this feature,
issue the command "call-home reporting anonymous".

Please remember to save your configuration.


ciscoasa(config)# int gi 0
ciscoasa(config-if)# ip add 192.168.0.1 255.255.255.0
ciscoasa(config-if)# nameif inside
INFO: Security level for "inside" set to 100 by default.
ciscoasa(config-if)# no shutdown
ciscoasa(config-if)# exit
ciscoasa(config)# exit
ciscoasa# copy run start

Source filename [running-config]?
Cryptochecksum: d78cc3c3 00c1ebd8 dbc3b1cd 61811d56

2024 bytes copied in 1.170 secs (2024 bytes/sec)
ciscoasa#
Warning
Don’t forget to assign a name to the network interface using the nameif
command otherwise it will be unusable!
Copy ASDM onto the ASA server.
Here Valerian Ceaus made another good post to describe ASDM installation onto an ASA server.
If you haven’t copied the ASDM file into you Windows host, this is now the time to do it. A convenient way to transfer them to your lab guests is to put them in an ISO image which will be mounted by the guest.
I use genisoimage to generate such images.
If it is not already installed in your environment, install it (the exact
command depending on your distribution):
1 | sudo aptitude install genisoimage |
The following command creates the asdm.iso file containing all asdm*.bin files, the TFTP server and Java setup (Java 6 here as this version is a requirement for CCP, if you only use ASDM you should be fine with more recent versions of Java1).
1 | genisoimage -JR -o asdm.iso asdm*.bin tftpd64.460.zip jre-6u45-windows-i586.exe |
Edit your Windows device settings, mount this ISO file in the CD-ROM drive, and start your Windows host.
-
On your Windows host, start the TFTP server and ensure that:
- The shared directory indeed contains you ASDM file (asdm-7*.bin).
- The listening interface is the external interface, reachable from the ASA server.
-
In the ASA server shell, use TFTP to retrieve the file:
ciscoasa# copy tftp: flash:

Address or name of remote host []? 192.168.0.100

Source filename []? asdm-715-100.bin

Destination filename [asdm-715-100.bin]?

Accessing tftp://192.168.0.100/asdm-715-100.bin...!!!!!
!!!!!!!!!!!!!!!!!!!!!!!!!!!!!!!!!!!!!!!!!!!!!!!!!!!!!!!
!!!!!!!!!!!!!!!!!!!!!!!!!!!!!!!!!!!!!!!!!!!!!!!!!!!!!!!
[truncated]
!!!!!!!!!!!!!!!!!!!!!!!!!!!!!!!!!!!!!!!!!!!!!!!!!!!!!!!
Writing current ASDM file disk0:/asdm-715-100.bin
!!!!!!!!!!!!!!!!!!!!!!!!!!!!!!!!!!!!!!!!!!!!!!!!!!!!!!!
!!!!!!!!!!!!!!!!!!!!!!!!!!!!!!!!!!!!!!!!!!!!!!!!!!!!!!!
[truncated]
!!!!!!!!!!!!!!!!!!!!!!!!!!!!!!!!!!!!!!!!!!!!!!!!!!!!!!!
22824520 bytes copied in 66.740 secs (345826 bytes/sec)
ciscoasa#
Note
You have to specify flash: as destination even if the file will actually be written to disk0 (don’t ask me why, ask Cisco!).
Now enable HTTPS on the ASA server and set the credential and source IP authorized to access ASDM:
ciscoasa# conf t
ciscoasa(config)# username admin password Cisco123
ciscoasa(config)# aaa authentication http console LOCAL
ciscoasa(config)# http server enable
ciscoasa(config)# http 192.168.0.100 255.255.255.255 inside
ciscoasa(config)# asdm image disk0:/asdm-715-100.bin
ciscoasa(config)# exit
ciscoasa# copy run start

Source filename [running-config]?
Cryptochecksum: 5fa74a4e e53c0aff c21234ef a2c32a86

2217 bytes copied in 1.90 secs (2217 bytes/sec)
ciscoasa#
Note
Here I use 192.168.0.100 which is the IP address of the Windows management host, in other words the IP address authorized to access the ASDM.
You can replace this with the IP address matching you setup, you can also allow a whole subnet to access ASDM by modifying the netmask, for instance:
ciscoasa(config)# http 192.168.0.0 255.255.255.0 inside
From your Windows machine, now use a browser and connect to ASA‘s HTTPS port (https://192.168.0.1 for instance) and click on the link to install the ASDM launcher. Accept the certificate, type the credential you defined above, your ASA should now be ready.

Post-install
Now that the installation is complete, don’t forget to edit the template device settings and, below the Advanced tab, tick the Use as a linked base VM checkbox.
-
I tested an ASDM 7.1.5 with ASA 8.4.2 with the latest version of Java (8) and Windows (2016) without encountering any issue. The ASDM link may not appear in the Widows’ Start menu so you need manually start the ASDM launcher from C:\Program Files (x86)\Cisco Systems\ASDM\. ↩
