In this article:
The main practical difference between a legacy hub and a switch is that the switch will do its best to forward ethernet frames only on the port allowing to reach the recipient, it won’t blindly forward everything everywhere as as a dumb hub would do.
To achieve this, upon reception of a frame the switch stores the senders MAC address associated to its input port in an internal memory, usually implemented as a CAM table. Thanks to this information, would a packet have the same address as recipient, the switch will now forward this packet only to this port and not the other ones.
I already wrote a more focused article on MAC table overflow within the context
of GNS3 simulated environments, which resulted in patch being submitted
upstream and initiated the development of the macof.py tool.
The original article is available here.
In this article I detailed a classical switch implementation as follow:
-
The switch receives an incoming packet on some port,
-
The switch then checks if the source MAC address is already stored in its MAC address table.
- If it isn’t and there is a free slot, it records this new MAC address associated to its incoming port.
- If the address is already present but associated to another port, it updates the record with the new port.
- In all cases this is also the occasion to reset the aging timer associated to this entry.
-
The switch then checks if the destination MAC address is already stored in the MAC address table.
- If it is, then this is all good and the switch outputs the packet on the interface associated to the matching CAM table entry.
- If it isn’t, the switch outputs the packet on all interfaces except the incoming one (all interfaces belonging to the same VLAN + the trunk ports as long as this VLAN is not pruned).
-
As a separate process the switch regularly deletes older entries where the aging timer went over a certain threshold (usually at least several minutes on real gear, hardcoded to 30 seconds in the case of the Dynamips emulated NM-16ESW router extension).
This works well… until the MAC address table gets full. In this case new entries corresponding to new sources addresses cannot be added anymore into the MAC address table. When incoming frames refer to these new sources addresses as recipient, the switch therefore has no other choice than falling back on the second bullet and forward the frames on all ports.
MAC address table are made large enough to prevent this situation to happen under normal circumstances (usually 1000 or 2000 entries for desktop switches and 5000 to 16000 entries for common enterprise ones). However, a malicious user may send a large number of packets, each bearing different source MAC address, which will artificially fill up switches MAC address tables, thus forcing them into this fall-back behavior.
This is this attack and the way to prevent it that we will see in detail.

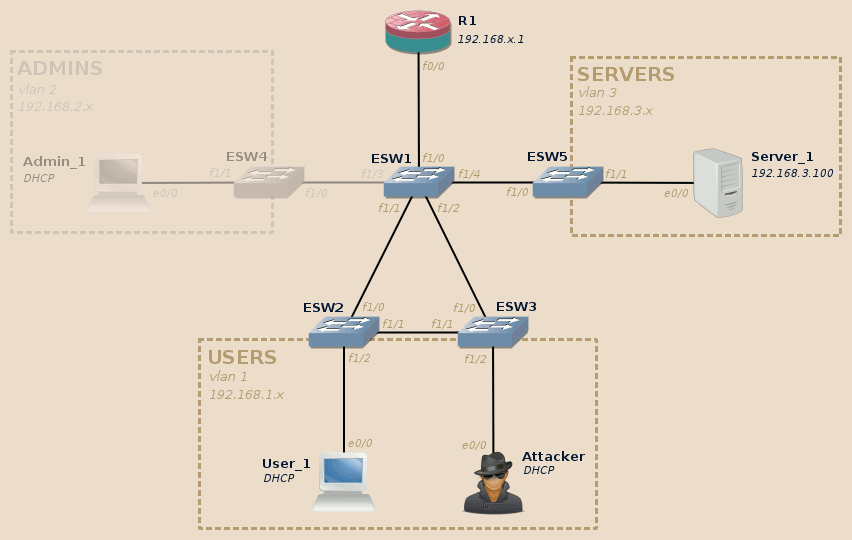
This articles relies on the same topology as the rest of the series. If you didn’t read the introduction post, do it now.
For this lab we will use the Users and Servers VLAN. The Admins VLAN will not be involved.
As per the tools, we will use macof.py, Wireshark and a browser with a plugin allowing to edit the cookies (here I will use Firefox with the Cookies Manager+ plugin).
Note
An Internet access allowing to download missing tools can be built for your Attacker node in GNS3 by adding a Cloud node to your topology and temporarily connecting the Attacker to it.
Initial state
| Lab | Compatible |
|---|---|
| Dynamips | Yes |
| IOU | Yes |
| Real gear | Yes |
Initially, MAC address tables only contains the minimum information allowing the switches to forward their packets correctly. Given the size of our lab network, this is not much information:
ESW2#show mac-address-table count

NM Slot: 1
--------------

Dynamic Address Count:                 1
Secure Address (User-defined) Count:   0
Static Address (User-defined) Count:   0
System Self Address Count:             1
Total MAC addresses:                   2
Maximum MAC addresses:                 8192
ESW2#show mac-address-table dynamic
Non-static Address Table:
Destination Address  Address Type  VLAN  Destination Port
-------------------  ------------  ----  --------------------
c201.068b.0000          Dynamic       3     FastEthernet1/0

ESW2#
Here ESW2 only has one entry: the R1 router. Also note that the table may contain up to a maximum of 8192 MAC addresses.
Note
If the counter is zero, ensure there is a minimum activity on the network for instance by pinging Server_1 from the Attacker machine.
Moreover, depending on the device, MAC address table information may be
available below the show mac-address-table or the show mac address-table
section.
The attack stages
MAC table overflow
| Lab | Compatible |
|---|---|
| Dynamips | Yes |
| IOU | No |
| Real gear | Yes |
The traditional tool for MAC table overflow attack is macof from the
dsniff project.
However this tool is old, seemingly unmaintained (last update in 2000) and I
find it quite inefficient for the task.
I therefore decided to build my own alternative, macof.py, available here.
Usually you should be able to run ./macof.py without any parameters to use the
default settings.
However, this attack is quite intense, specially on home virtual labs, so to
create the best conditions you may need to adapt default settings a little:
-
We have seen previously that our router-based switch has a MAC address table limited to 8192 entries, we will therefore not bother with the default of creating 20000 MAC entries but limit ourselves to this number.
-
We will also slow down packets sending, first sending 3000 packets per second to fill the switches MAC tables and then around one packet per millisecond.
We won’t be able to slow the refresh much in the virtual lab compared to real gear because the MAC address aging-time in Dynamips’ NM-16ESW implementation is hardcoded to a very low value (30 seconds, while the default on real gear is 5 minutes).
Here is the command I will use:
root@kali:~# ./macof.py -c 8192 -f 3000 -w 1
macof.py <https://www.whitewinterwolf.com/projects/>

* Pre-generating 8192 packets...
* Sending 3000 packets per second, looping 1 times.
Actual: 8192 packets (540672 bytes) sent in 2.73 seconds
Rated: 198020.1 Bps, 1.58 Mbps, 3000.30 pps
Flows: 8192 flows, 3000.30 fps, 8192 flow packets, 0 non-flow
Statistics for network device: eth0
        Successful packets:        8192
        Failed packets:            0
        Truncated packets:         0
        Retried packets (ENOBUFS): 0
        Retried packets (EAGAIN):  0
* Sending one packet every 1 milliseconds, press Ctrl+C to terminate.
Wait a few seconds, switches CAM tables should now be filled up:
ESW2#show mac-address-table count

NM Slot: 1
--------------

Dynamic Address Count:                 8188
Secure Address (User-defined) Count:   0
Static Address (User-defined) Count:   0
System Self Address Count:             1
Total MAC addresses:                   8189
Maximum MAC addresses:                 8192
ESW2#
Note
In practice the MAC table size is capped to 8189 instead of 8192. This is an implementation issue of Dynamips’ NM-16ESW module with no consequence.
As the attacker, you could also take advantage of the Spanning-Tree protocol to redesign the topology to make the flooding and data interception even more efficient. More information can be found in the previous post of this series.
Eavesdropping
It is now time to fire-up Wireshark.
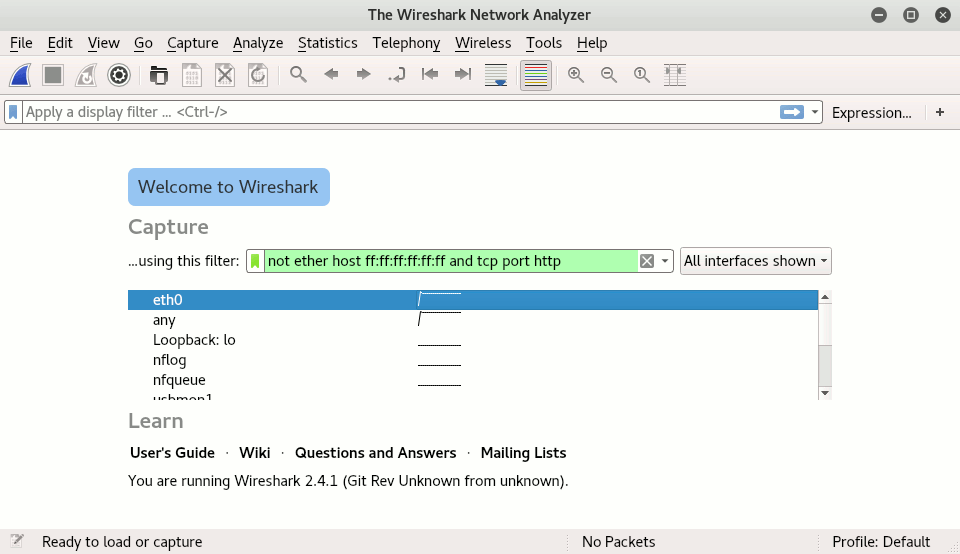
Before starting the capture, you may want to specify a capture filter:
-
To ignore the frames crafted to flood the MAC tables.
By default
macof.pycrafted packets use the broadcast MAC address as destination, to ignore them use the expressionnot ether host ff:ff:ff:ff:ff:ff -
To focus on HTTP packets.
This is mainly for the lab purposes, as this will make working with Wireshark easier, particularly on home virtualized environments. To do this we add
and tcp port httpto the above expression.Note
A lot of processing goes in Wireshark’s live packet analysis.
For the sake of the lab, we chose to focus on the packets which we already know to be the most interesting. If a processing becomes an issue in real-life situations (Raspberry anyone?), it is common to dissociate:
- The data collecting phase, building large .pcap files storing all sniffed all data with little to no discrimination in raw form.
- The data analysis phase, which may occur at a later time and on a different machine.
This gives the following capture filter:
not ether host ff:ff:ff:ff:ff:ff and tcp port http:

Note
Don’t confuse Wireshark’s capture and display filters:
-
The capture filter allow to select the data to capture at an early stage. Data not matching the filter is ignored, freeing processing time for more relevant data which, otherwise, might be loss especially in case of high load or activity.
-
The display filter, as its name implies, only filters the data displayed in the GUI. Data not matching the filter is still collected and analyzed by the various Wireshark processors, this filter has no noticeable impact on Wireshark performances.
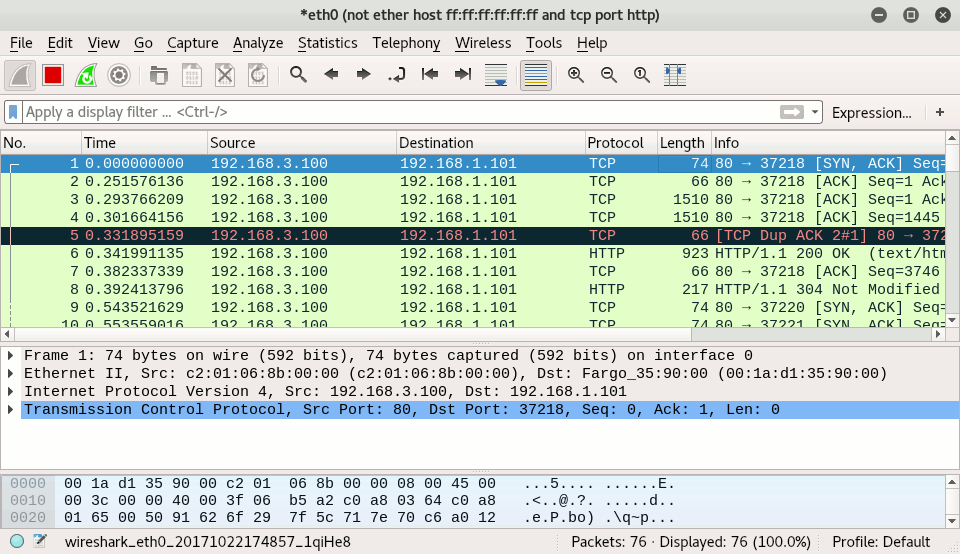
Start the User_1 host and access Server_1 home page: Server_1 replies should appear in Wireshark window:

Note
If you don’t capture anything and the User_1 host was already running, close its Firefox for more than 30 seconds then try again: Firefox may have a background network activity (checking updates and sending usage statistics) registering User_1 MAC address in switches MAC address tables.
For the same reason, in real-life this attack will be the most efficient after a long period of inactivity where the computer were either turned-off or in stand-by mode, typically the beginning of the work day and, to a lesser extend, after the lunch pause.
As you can see in the screenshot, we have only one side of the communication: every captured packet go from the server (source = 192.1683.100) to the client (destination = 192.168.1.101), we did not capture any packet going the other way around.
This is normal and expected, albeit largely ignored by those limiting themselves to theoretical approaches of security and thinking that MAC table overflows somehow magically “turns a switch into a hub” or make it “fail open in repeating mode”, as it is often described.
This depends on the algorithm implemented in the switch, but on sane and modern devices the MAC flooding should not be able to overwrite already existing and legitimate MAC entries (except following an inactivity period longer than the configured maximum aging-timer, as usual).
Under normal circumstances the default router address is always known to the switches as nearly all activity on the network involves it. It is one of the first address learned when the switch is started and is permanently refreshed. The addresses that are added and removed from the switch throughout the day are those of end-nodes, here user’s workstation.
By filling the switches MAC address tables, we prevented the switches from learning the MAC address of the User_1 host, however the address of the default router R1 was already known and will remain known. The overflow won’t change anything to that.
Because of this:
-
Packets going from User_1 to R1 (and then Server_1) are correctly forwarded by relying on R1 MAC address present in the switches MAC address tables.
-
When reply packets sent by Server_1 come through R1 and try to reach User_1, the MAC address of the User_1 host is missing in the switches MAC address table due to our attack and therefore the switch fallback in broadcasting them.
We can therefore see that this attack has two main limitations:
-
We may have access to only one side of the communication.
-
This is a eavesdropping attack, not a man-in-the-middle attack: we receive server answer at the same as the legitimate destination, this attack does not provide an easy way to alter server’s answers.
Nevertheless, we will see an example how this attack can be still be used with profit.
Session stealing
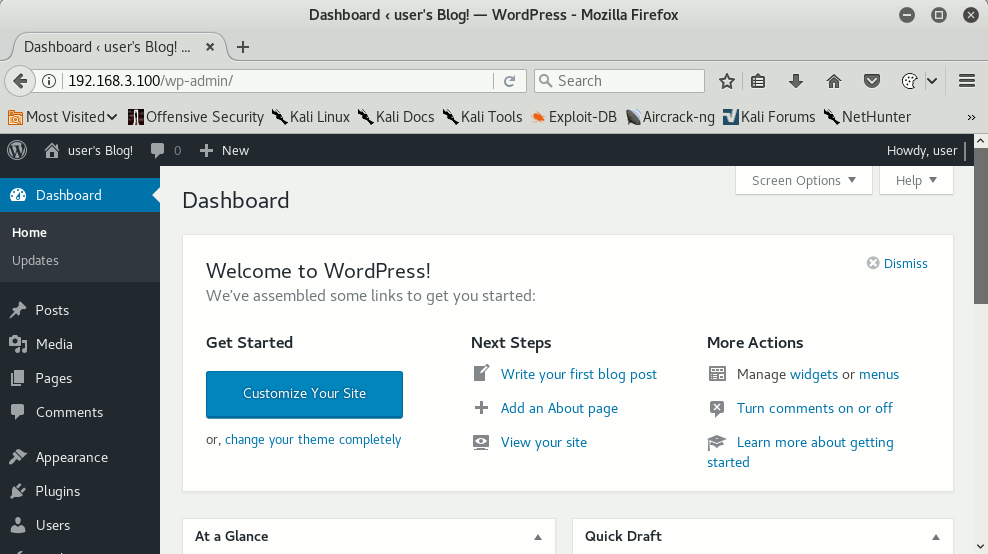
Go back on User_1 and access to a management page of the Server_1 web application. On my side, I will access a Wordpress administration page (for those using the same appliance as me, click on the Bitnami logo in the bottom-right corner to get a listing of default credentials and links to available management pages).
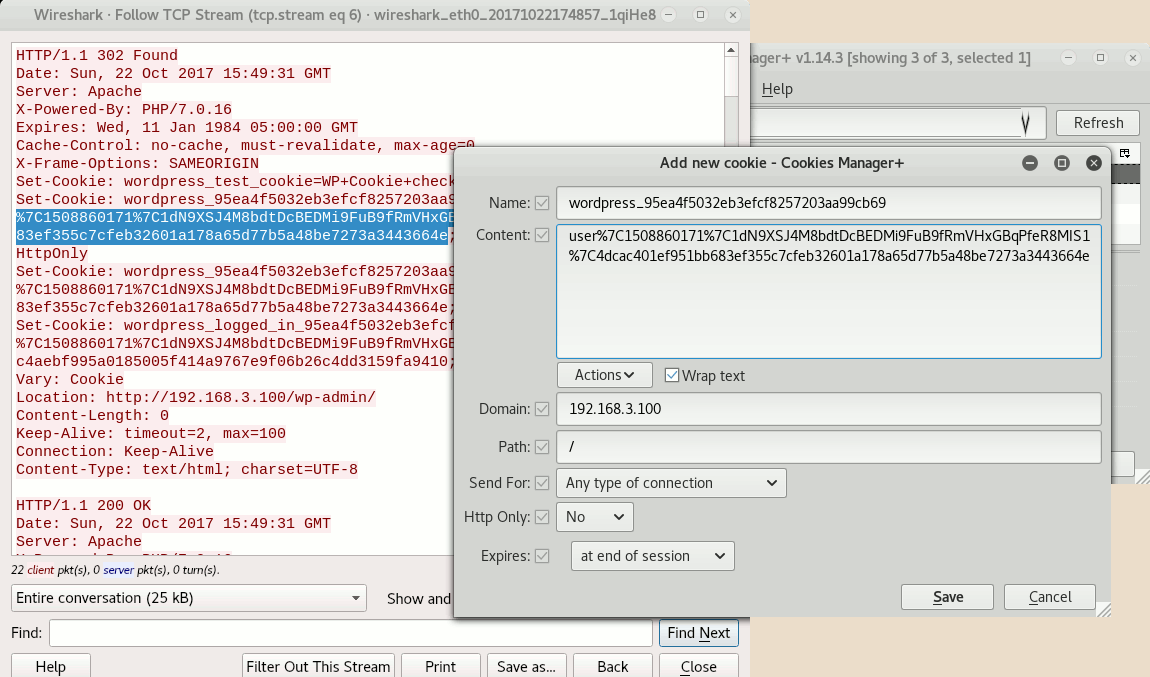
On Wireshark, find one of the packets corresponding to the server answer to the user succcessful authentication, then right-click on it > Follow > TCP Stream.
Note
You must locate the server’s answer to the user authentication, at it is at this moment that the server’s reply contains the cookies values. Other messages from the server won’t contain them, and as you don’t have access to the data sent by the client you cannot fetch this information from there too.
In case of doubt, don’t hesitate to do a few attempts by login-off and login-in the user again, noting each time the number of the last packet captured by Wireshark.
In real world, you may have dozens of users opening new sessions after an inactivity time, being able to capture just a few of them might be enough.
You should obtain the full server answer to the user login process. While you don’t have user’s password, you still have access to users cookies:

Still on the Attacker machine, fire-up a browser, go on Server_1 authentication page (http://192.168.3.100/wp-admin in my case): you are not authenticated (yet!).
Edit your browser’s cookies and manually add the previously captured cookies as new cookies. As mentioned above, on my side I use Cookies Manager+ for this task:

I added to new cookies, prefixed wordpress_… and wordpress_logged_in_…:

Try again to access the authentication URL: “Welcome!”, you are now granted access to the administration interface!

Next steps
As an attacker, there are several things that you can now do, depending on what you want to achieve:
-
Maintain your access:
-
In its current shape, this access will be available only for as long as the legitimate user does not close the session by clicking on a Logout link. If the user closes his browser without closing the session then you have this session all for yourself.
-
To steal the account, you can edit user’s settings and change the email address to an address you control and set a new password of your choosing.
Changing the password here is easy as the previous password is not asked to set a new one, but would it be the case simply use the “Lost your password?” link to reset it after having changed the email address.
In this scenario the attacker will usually don’t nitpick but change all user information (including credit card and phone numbers, postal addresses, change security question and backup accounts, etc.). Such information may be indeed used by support teams to check user’s identity in case of a stolen account claim, altering them may prevent such recovery to work as demonstrated in the How I Lost My $50,000 Twitter Username case1.
-
More sneakily, if we are lucky and have any administrative privileges it may possible to create new accounts or modify the privileges or credentials of existing accounts (in particular unused ones).
-
-
Attack the server:
-
Is there any feature allowing to upload files, if yes does one of them open the possibility to upload a webshell, in one way or another?
-
Is there any feature allowing to execute a command on the host, such as maintenance tasks?
-
Is there any feature allowing to input server-side scripting code?
More generally, once the attacker managed to get access to a valid account on a system, the attack surface usually becomes much wider.
-
-
Attack other users:
-
Create new content or modify existing content to include malicious code and infect other users viewing modified content.
-
Use the newly gained abilities as part of a social engineering attack, impersonating the legitimate user toward third parties.
-
Of course, none of these suggestions is exclusive and this list it not restrictive. A determined attacker will most likely engage through various ways and channels simultaneously to get the most impact, both technically and psychologically.
Mitigation
| Lab | Compatible |
|---|---|
| Dynamips | No |
| IOU | Yes |
| Real gear | Yes |
The mitigation for this attack is to set a limit on the number of devices expected per port. On Cisco devices, this is achieved by enabling Port Security.
As far as the virtual lab is concerned, while IOU doesn’t allow to really reproduce the attack itself, using MAC table overflow tools still allows to increase the number of entries in its CAM:
IOU3#show mac address-table count vlan 1

Mac Entries for Vlan 1:
---------------------------
Dynamic Address Count  : 14604
Static  Address Count  : 0
Total Mac Addresses    : 14604

Total Mac Address Space Available: 183046404

IOU3#
Port Security must be enabled on a per-port basis on each access layer switches:
IOU3#conf t
Enter configuration commands, one per line.  End with CNTL/Z.
IOU3(config)#int range ethernet 1/0 - 3
IOU3(config-if-range)#! The port must explicitly be set to access mode.
IOU3(config-if-range)#switchport mode access
IOU3(config-if-range)#switchport port-security
IOU3(config-if-range)#! By default only 1 MAC address allowed.
IOU3(config-if-range)#switchport port-security maximum 5
IOU3(config-if-range)#end
IOU3#
*Oct 22 17:18:18.760: %SYS-5-CONFIG_I: Configured from console by console
IOU3#show port-security
Secure Port  MaxSecureAddr  CurrentAddr  SecurityViolation  Security Action
                (Count)       (Count)          (Count)
---------------------------------------------------------------------------
    Et1/0              5            1                  0         Shutdown
    Et1/1              5            0                  0         Shutdown
    Et1/2              5            0                  0         Shutdown
    Et1/3              5            0                  0         Shutdown
---------------------------------------------------------------------------
Total Addresses in System (excluding one mac per port)     : 0
Max Addresses limit in System (excluding one mac per port) : 4096
IOU3#
IOU3#copy running-config startup-config
Destination filename [startup-config]?
Building configuration...
Compressed configuration from 1901 bytes to 1052 bytes[OK]
IOU3#
Warning
Port-security default value is very low (one single MAC address allowed per port). There are various reasons why more than one address may appear on a port: presence of an IP phone in addition to the workstation, the user may be using virtual machines in bridge mode, the user may use a desktop switch to share a wired connection with a colleague, etc.
Unless your policy explicitly forbids such situations, you will most likely want to increase this value. As long as preventing MAC table flooding is concerned, there is no issue in setting this value to a few dozen: this will still prevent attackers from simulating thousands of devices while avoiding false positives and prevent legitimate users from doing their work.
Now attempting to run the attack makes the port to be automatically shutdown, isolating the offender:
IOU3#
*Oct 22 17:23:48.769: %PM-4-ERR_DISABLE: psecure-violation error detected on Et1/0, putting Et1/0 in err-disable state
IOU3#
*Oct 22 17:23:48.769: %PORT_SECURITY-2-PSECURE_VIOLATION: Security violation occurred, caused by MAC address a8bd.c94b.66e9 on port Ethernet1/0.
*Oct 22 17:23:49.769: %LINEPROTO-5-UPDOWN: Line protocol on Interface Ethernet1/0, changed state to down
IOU3#
*Oct 22 17:23:50.769: %LINK-3-UPDOWN: Interface Ethernet1/0, changed state to down
IOU3#
IOU3#show interfaces status err-disabled

Port      Name               Status       Reason               Err-disabled Vlans
Et1/0                        err-disabled psecure-violation
IOU3#
The port can be restored manually, the same way as with BPDU Guard:
IOU3#conf t
Enter configuration commands, one per line.  End with CNTL/Z.
IOU3(config)#int ethernet 1/0
IOU3(config-if)#shutdown
IOU3(config-if)#
*Oct 22 17:29:11.885: %LINK-5-CHANGED: Interface Ethernet1/0, changed state to administratively down
IOU3(config-if)#no shutdown
IOU3(config-if)#
*Oct 22 17:29:15.077: %LINK-3-UPDOWN: Interface Ethernet1/0, changed state to up
*Oct 22 17:29:16.077: %LINEPROTO-5-UPDOWN: Line protocol on Interface Ethernet1/0, changed state to up
IOU3(config-if)#end
IOU3#
*Oct 22 17:32:31.808: %SYS-5-CONFIG_I: Configured from console by console
IOU3#
And a timer can also be set to enable port auto-recovery:
IOU3#conf t
Enter configuration commands, one per line.  End with CNTL/Z.
IOU3(config)#errdisable recovery cause psecure-violation
IOU3(config)#! By default the timeout is set to 300 seconds (= 5 minutes), to change it:
IOU3(config)#errdisable recovery interval 30
IOU3(config)#end
IOU3#
*Oct 22 17:35:13.030: %SYS-5-CONFIG_I: Configured from console by console
IOU3#
Now the switch should be able to shutdown the port during the attack, and restore it afterwards:
IOU3#
*Oct 22 17:38:04.009: %PM-4-ERR_DISABLE: psecure-violation error detected on Et1/0, putting Et1/0 in err-disable state
IOU3#
*Oct 22 17:38:04.009: %PORT_SECURITY-2-PSECURE_VIOLATION: Security violation occurred, caused by MAC address c049.eef6.3ede on port Ethernet1/0.
*Oct 22 17:38:05.009: %LINEPROTO-5-UPDOWN: Line protocol on Interface Ethernet1/0, changed state to down
IOU3#
*Oct 22 17:38:06.010: %LINK-3-UPDOWN: Interface Ethernet1/0, changed state to down
IOU3#
*Oct 22 17:38:34.010: %PM-4-ERR_RECOVER: Attempting to recover from psecure-violation err-disable state on Et1/0
IOU3#
*Oct 22 17:38:36.015: %LINK-3-UPDOWN: Interface Ethernet1/0, changed state to up
*Oct 22 17:38:37.023: %LINEPROTO-5-UPDOWN: Line protocol on Interface Ethernet1/0, changed state to up
IOU3#
Here we kept the default action, err-disable, which is the most brutal.
When a Port Security violation occurs, alternative actions can be selected:
-
protectsilently drops frames bearing new MAC addresses once the maximum number of address on this port has been reached, keeping the port up and the connectivity for already registered MAC addresses. -
restrictdoes the same thing asprotect, but in addition generates a Syslog messages to notify administrators.
To select the protect mode instead of the default err-disable:
IOU3(config-if-range)#switchport port-security violation protect
IOU3(config-if-range)#
Port Security also supports sticky addresses. This is an intermediary solution between manually hardcoding end-nodes MAC addresses in the switch configuration and the dynamic process learning described until now. Here new addresses up until the maximum allowed become an integral part of the switch running configuration: aging-time will not erase them, and if the running configuration is saved as the startup configuration then they will also survive across switch reboots.
The sticky addresses setting is independent of the violation action setting:
IOU3(config-if-range)#switchport port-security mac-address sticky
IOU3(config-if-range)#
-
Fortunately the story as a good ending and Naoki Hiroshima managed to get back his Twitter account, mainly thanks to the fluff around this case and having done the headlines on several major websites. The whole process however took a full month, with Twitter somewhere in the middle closing the account and releasing it the wild for anyone to grab it instead of giving it back to its initial user. Most users however won’t have the knowledge, time and energy to defend themselves the way he did. ↩

Next: DHCP exploitation guide
A step-by-step guide to practical DHCP exploitation and protection.

