
In this article:
SCEP is a protocol supported by several manufacturers, including Microsoft and Cisco, and designed to make certificate issuance easier in particular in large-scale environments.
It proceeds in a few steps:
- The SCEP server issues a one-time password (the “challenge password”), transmitted out-of-band to the client.
- The client generates a key pair, and sends the certificate signing request to the SCEP server along with the one-time password.
- The SCEP server validates the client certificate data (in this how-to the validation will be manual), signs it and makes the signed certificate available to the client.
- The client regularly pull the SCEP server until its signed certificate becomes available. The client can then fetch the signed certificate and install it.
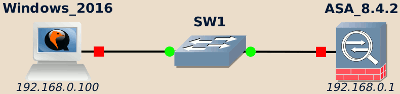
Here we will setup a Windows Server as SCEP server, and use a Cisco ASA as SCEP client.

The topology above mentions Windows 2016, but any other Windows server will do. This how-to covers both Windows 2016 and 2008 as there are a few differences.
Choosing a suitable Windows edition is covered here.
Windows (SCEP server)
The Microsoft website provides more documentation on Active Directory Certificate Services and Network Device Enrollment Service.
Configure IP address and hostname
More details on IP address and hostname configuration can be found here.
Note
If you want to customize the Windows server hostname, do it now as it won’t be possible once the Certificate Services has been installed.
Install Windows Certificate Services
Open the Server Manager (recent Windows Server open it automatically when opening a new session, otherwise you can find it either in the taskbar or as part of the Administrative Tools below the Start menu).
In the Roles section, click on Add Roles. Select the Active Directory Certificate Services role.
When asked to select additional role services:
-
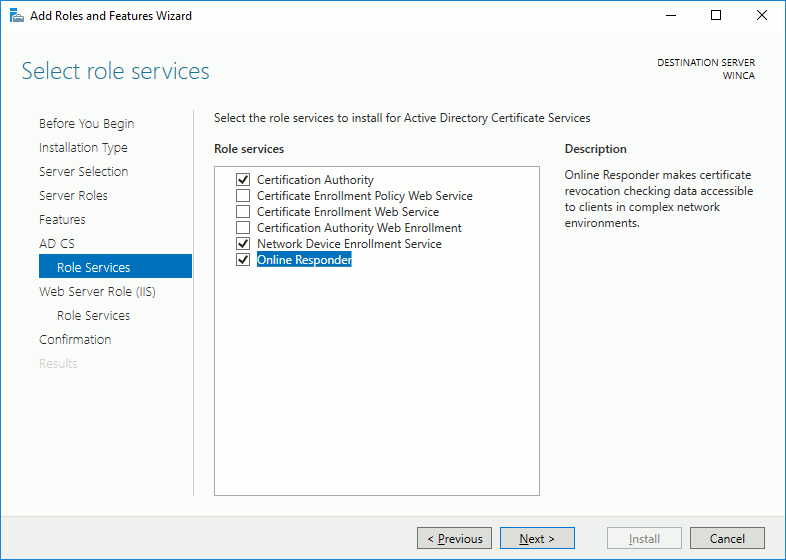
On recent Windows versions, select Certification Authority, Network Device Enrollment Service and Online Responder services:
-
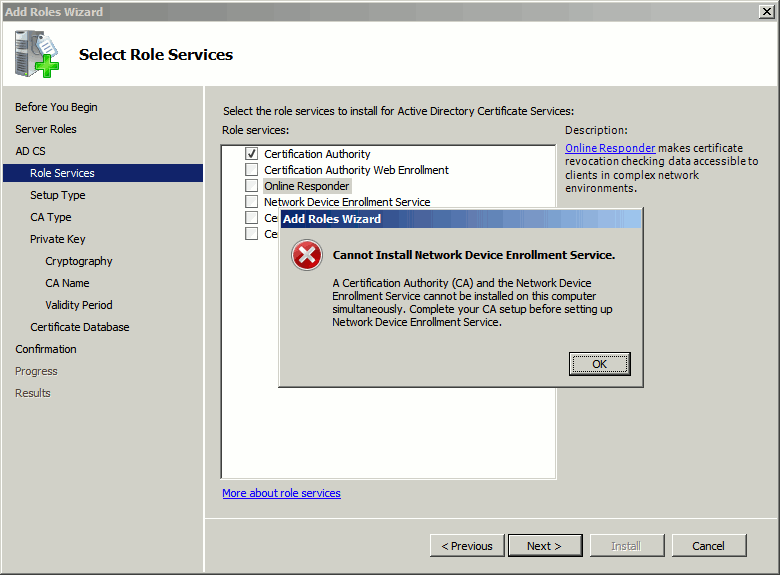
On older Windows versions, only install Certification Authority for now, we will install the rest later:


Then Next, Next, Next, Install.
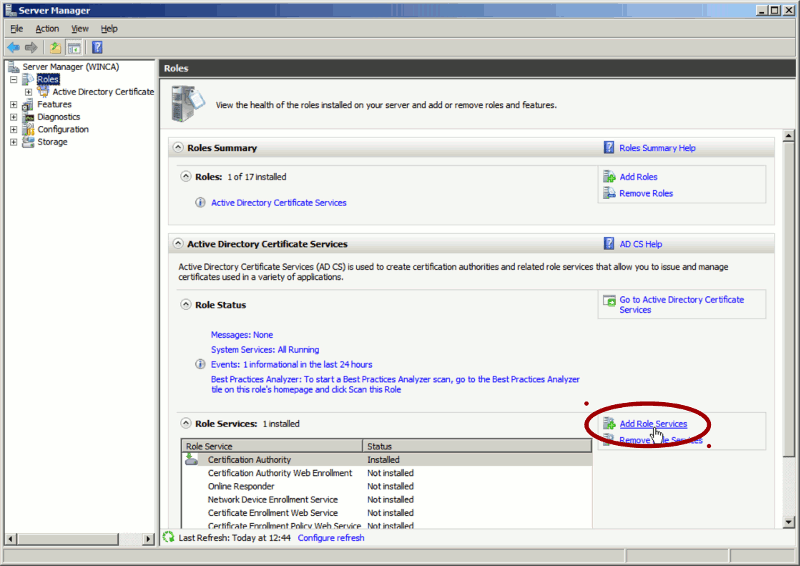
On older Windows, as stated above you need to install the roles services as a separate step. In the Server Manager, in the Roles section click on Add Role Services.

Note
Don’t confuse the Server Manager, which is started by default on newer Windows versions, with the Initial Configuration Tasks started on older versions. While the later proposes an option to add new roles, there is no option to manage roles services.
On newer Windows, services of installed roles can be added directly from the Add Roles wizard.
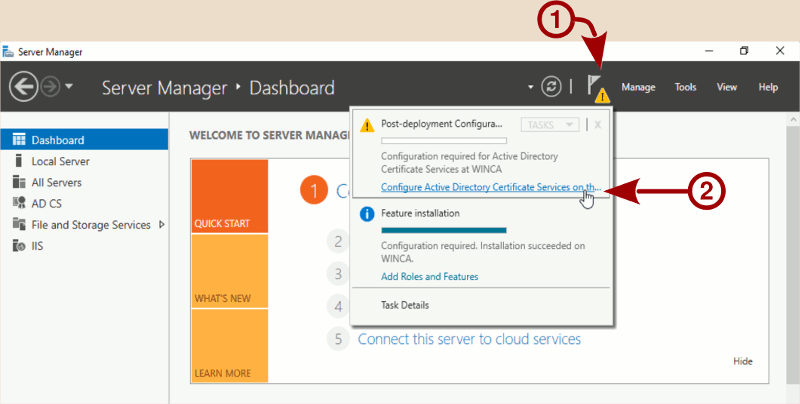
On newer Windows, the service configuration is a separate step. On the top bar of the Server Manager you should see a warning sign (➀), click on it then on the Configure Active Directory Certificate Services link (➁).

You will have to first configure the Certification Authority, and then go back to the role services configuration screen to configure the Network Device Enrollment Service and Online Responder services as a second step.
If the installation went right, you should be asked about the service account to use, select Use the built-in application pool identity.
Then a bit of Next, Next, Next, Configure and the SCEP server should be up and ready to serve requests.
Manage the SCEP server
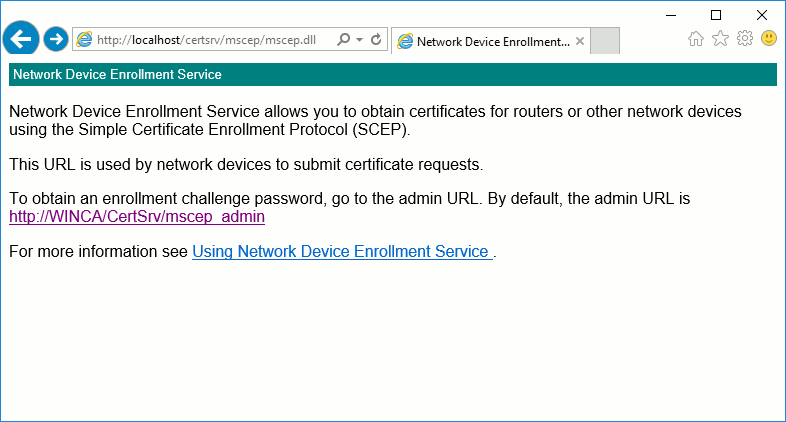
The SCEP server should by default listen on port 80 on all interfaces.
To access it, open Internet Explorer and access
http://localhost/certsrv/mscep/mscep.dll:

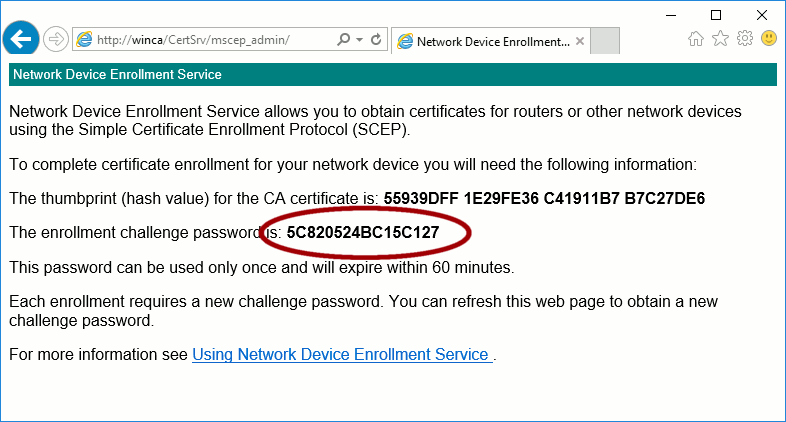
A link should propose you to access http://localhost/certsrv/mscep_admin/ to
generate new enrollment passwords.
The Administrator password is required to access this page:

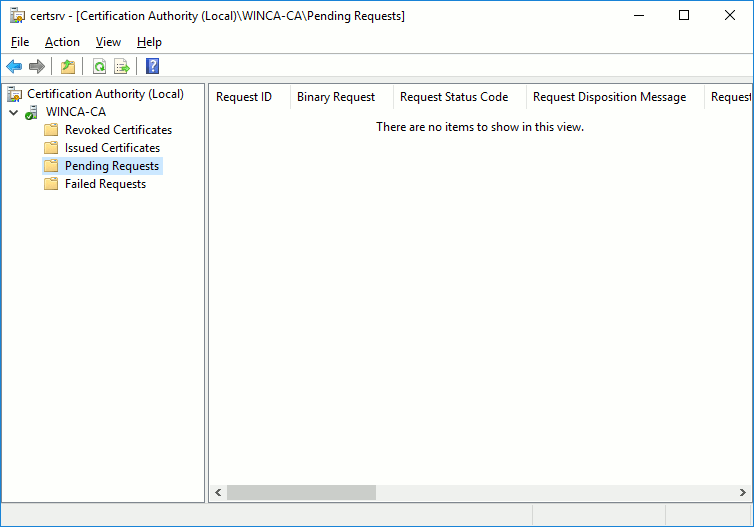
Now execute certsrv.msc (the Execute tool has been moved below the
Windows System group in newer Windows versions):

Certificate pending for validation are available in the Pending Requests section: right-click on them to issue signed certificates.
Cisco ASA (SCEP client)
Configure the IP address and HTTPS server
The details on how to configure ASA IP address and HTTPS server (required for ASDM) can be found here.
All the upcoming configuration are done using the ASDM GUI.
Import the SCEP server CA certificate
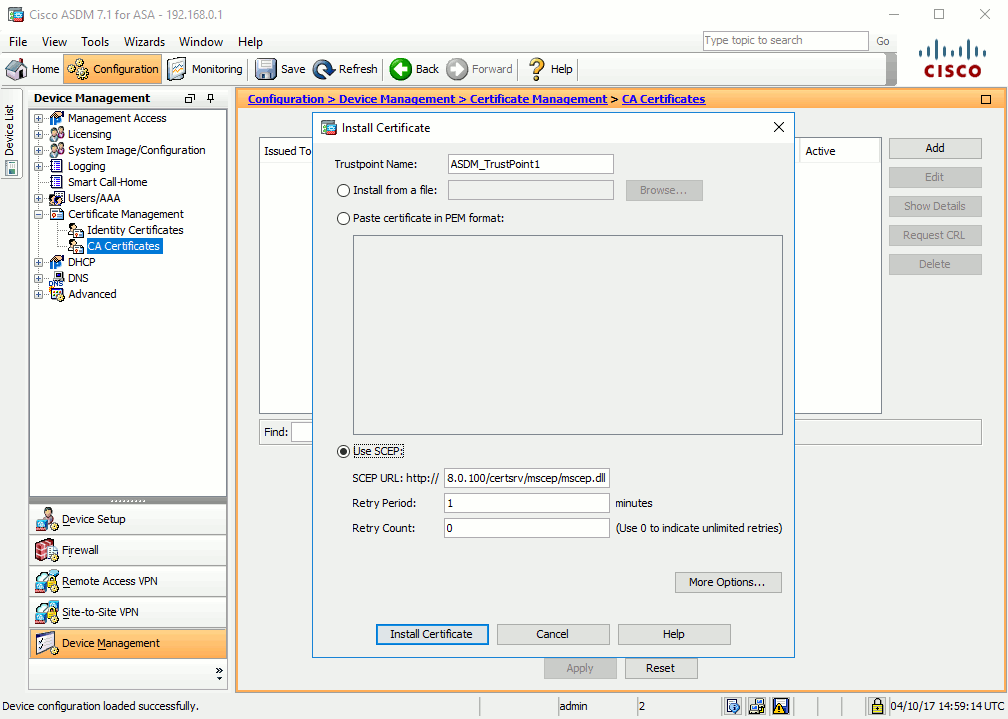
Go in Configuration > Device Management > Certificate Management > CA Certificates, then click Add and fill the SCEP server information to download the the server’s CA certificate.

Create a new key pair and submit the request to the server
Warning
Ensure that the ASA and the SCEP server have a similar time. If the ASA is too far behind, the Windows’ CA start of validity period may appear in the future for the ASA, making this certificate invalid and making enrollment to fail.
ASA current time can be checked and corrected in Configuration > Device Setup > System Time > Clock.
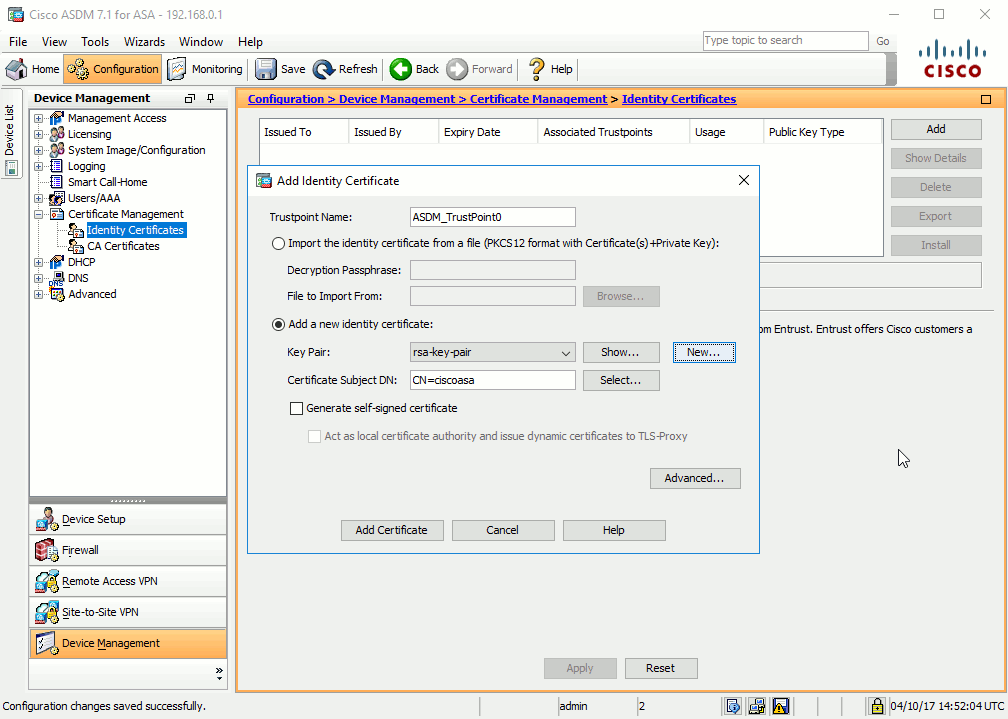
Go in Configuration > Device Management > Certificate Management > Identity Certificates and click Add.

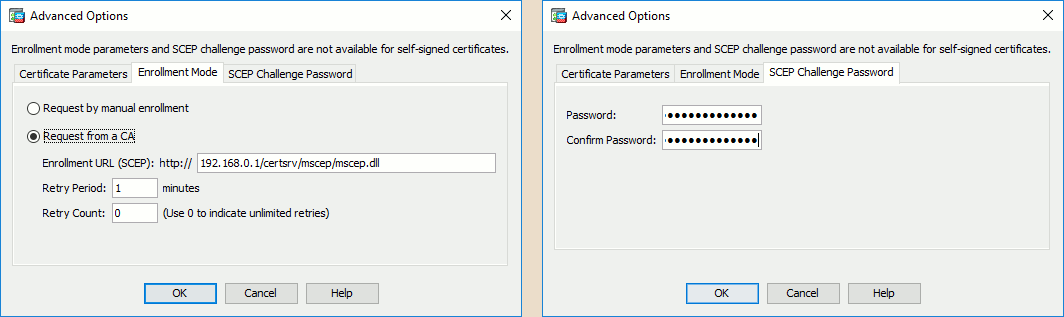
Click the New… button to create a new key pair, then the Advanced… button to fill the SCEP server information below the Enrollment mode and SCEP Challenge Password tabs:

Click on Add Certificate to send the request to the SCEP server, you should get a message like:
Enrollment request has been sent to the Certificate Authority.
To check the enrollment status, click on the refresh button.
On SCEP server side, ASA certificate should appear in the Pending Requests. Right-click on it and select the Issue task to issue the signed certificate.
ASA pulls the SCEP server on a regular basis, you may have to wait one or two minutes before the signed certificate is fetched and installed on the ASA.
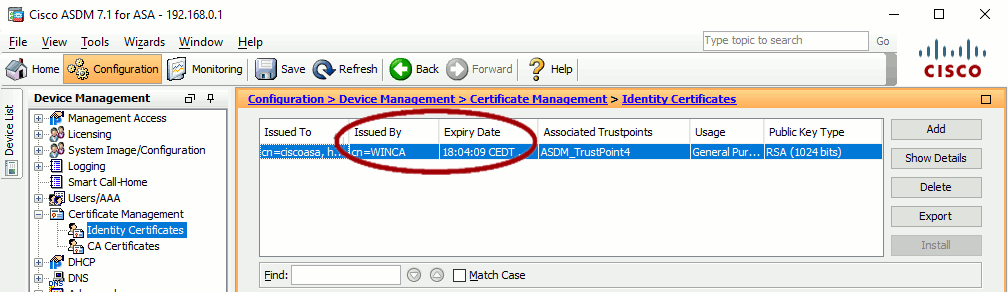
Click the Refresh button to see if ASA‘s certificate has been correctly enrolled. It should now show the SCEP server as issuer and a valid expiration date:

The ASA has now a private certificate signed by the Windows’ CA.