
In this article:
While installing GNS3 and VMware should be easy, it in fact very easy to loose a lot of time on silly issues.
-
If you are interested only in installing VMware Player, feel free to directly go corresponding part.
-
If you are interested in installing GNS3, I also recommend to install VMware player as some appliances may require it.
RouterGods also shared a few tips on how to setup a more comfortable GNS3 lab. Take a few minutes to check it once you’ve ended the installation!
Installing GNS3
GNS3 relies on Linux kernel features. If you are not a Linux user, the recommended way to use GNS3 is to use the GNS3 official virtual machine. This virtual machine may also be a good solution if you are a Linux user but you just want to quickly test GNS3 or do not want to modify your host environment.
For a regular usage of GNS3, I recommend setting-up a dedicated lab machine. You can see this post for more information on this topic.
This article is based on the official GNS3 installation guide, focused on Debian systems and with a few additions where necessary.
Installation process
GNS3 uses the same packages for Ubuntu and for Debian. If you are using Debian, you must therefore edit the packages source to point directly to GNS3’s Ubuntu repository.
Edit the file /etc/apt/sources.list and add the following lines:
deb http://ppa.launchpad.net/gns3/ppa/ubuntu xenial main
deb-src http://ppa.launchpad.net/gns3/ppa/ubuntu xenial main
Note
Here I’m assuming that you are using Debian 9 Stretch which matches Ubuntu 16.04 Xenial.
To know which Ubuntu repository matches your Debian version, check the GNS3 official installation guide.
Now you must import the key which allows your Debian host to check GNS3 packages authenticity, and then install these packages:
1 2 3 | sudo apt-key adv --keyserver keyserver.ubuntu.com --recv-keys F88F6D313016330404F710FC9A2FD067A2E3EF7B sudo aptitude update sudo aptitude install gns3-gui vncviewer |
To enable Qemu virtual machine support, also install the following packages (GNS3 uses VNC Viewer to display a Qemu virtual host node terminal):
sudo aptitude install qemu vncviewer
If you need to recompile Dynamips from the sources (for instance to apply the patches I mention in this post), you also need the following packages:
1 | sudo aptitude install build-essential cmake libelf-dev libpcap0.8-dev |
A few supplementary notes:
-
During Wireshark installation process(it comes as a GNS3 dependency) there is a message telling you that only members of the wireshark group will be able to capture network paquets. So don’t forget to add your GNS3 users to this group as Wireshark is very useful to debug the communication between to guest in the virtual network.
If you installed Qemu, you may also need to add these users to either the kvm or the libvirtd group (depending on your distribution, check your /etc/groups file) to be able to use hardware-assisted virtualization.
-
GNS3 is very sensitive to locales configuration. If you encounter a “could not find a default locale” error message, launch it while setting an explicit locale value (use
locale -ato list available locales on your system):1
LC_ALL=en_US.UTF8 gns3
-
The GNS3 GUI process can be launched as a background task (
gns3 &), but for some reason you may encounter freezes in particular when starting Qemu virtual machines. So prefer to leave it as a foreground task on its own terminal.
VMware Player installation
VMware Player is closed-source and, therefore, might seem a bit unclean in an otherwise open-source lab platform. But for now it is still a de-facto standard and I consider it a necessary evil. For more information, see my post on building a virtual lab.
In case of doubts on some steps, refer to the GNS3 official documentation.
Installation process
VMware does not rely on the Linux kernel virtualization functionalities (KVM), instead it installs its own kernel modules. But to be compatible with your kernel, he has to link them with your current kernel headers.
First, you need to ensure that your system is correctly updated, notably to avoid any incoherency between the currently running kernel and installed header files:
1 | sudo aptitude safe-upgrade |
Then, install the dependencies required to build the VMware modules:
1 | sudo aptitude install build-essential linux-headers-amd64 |
Download and install the following VMware components (as for now none of these links require registration):
- VMware Player
- VMware VIX API (SDK) (required for GNS3 - VMware interoperability).
VMware assumes that you can run GUI applications as the root user. If this is not the case in your environment, use the command below to compile and install VMware modules:
1 | DISPLAY= sudo vmware-modconfig --install-all |
Note
Several websites mention a --console option, but it does not seem
supported anymore.
Restart your machine to ensure that all installed files are correctly loaded:
1 | sudo shutdown -r now |
GNS3 is not able to create the virtual network adapters used by VMware virtual machines on-the-fly, you must create them beforehand using the following command (this commands need to be used only once, as part of the installation process):
1 | sudo gns3vmnet -r 10 39
|
This will create 30 virtual network adapters which should be enough for most situations. Feel free to decrease or increase the last parameter value depending on your needs.
Note
To remove those virtual interfaces, use the following command:
1 | sudo gns3vmnet -C |
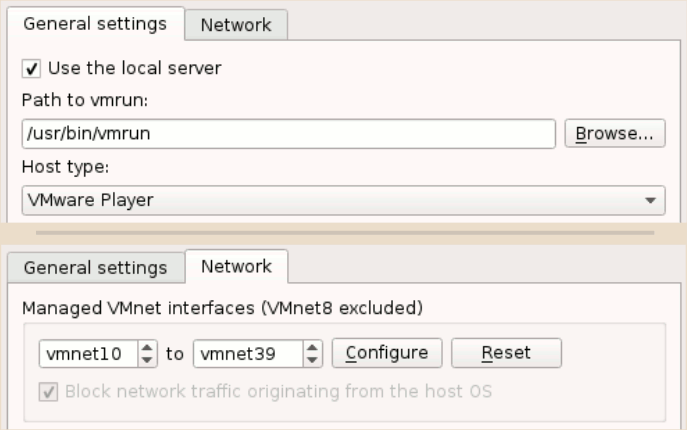
Now start GNS3, then from the menu bar go in Edit > Preferences > VMware and set the following settings:
- Path to vmrun should be configured automatically on a sane installation.
- Host type: set this to VMware Player.
- Go in the Network tab, set the VMnet range to match
gns3vmnetparameters (vmnet10 to vmnet39 in the previous example).

Unsing VMware images in GNS3
You may encounter a few pitfalls when using VMware images in GNS3. I describe here the main ones with their solution.
Import a VMware image into GNS3
Two things must be kept in mind when importing VMware image into GNS3:
-
To be detected by GNS3, VMware images must be stored in the VMware Player home directory: ~/vmware.
-
In the GNS3 topology, open the host node configuration screen and, under the Network tab, do not forget to check the Allow GNS3 to use any configured VMware adapter option.
Installation of the VMware tools in the guests
Some Linux distributions already provide a more up-to-date alternative to VMware default tools. Search your guest’s package repository for a package named open-vm-tools or open-vm-tools-desktop.
Otherwise, you will have to install the default VMware tools. They are not provided with the VMware Player installation archive, and VMware assumes (again!) that you can open a GUI as root.
You can use my vmware-gettools.sh script to
fetch and store all tools installers on your host system (run it as an
unprivileged user, it uses sudo internally to execute privileged commands
when required).
Then you will have access to the VMware Player menu options allowing you to
mount tools installers in the guest as CD-ROM images.
Common issues
Here are the workarounds for common issues encountered when using VMware Player. You will find information on more issues here.
Keyboard issues
On some environments, the AltGr keyboard key may be ignored by the guest.
To solve this, edit the file ~/.vmware/preferences and add the following lines:
xkeymap.keycode.108 = 0x138 # Alt_R
xkeymap.keycode.106 = 0x135 # KP_Divide
xkeymap.keycode.104 = 0x11c # KP_Enter
xkeymap.keycode.111 = 0x148 # Up
xkeymap.keycode.116 = 0x150 # Down
xkeymap.keycode.113 = 0x14b # Left
xkeymap.keycode.114 = 0x14d # Right
xkeymap.keycode.105 = 0x11d # Control_R
xkeymap.keycode.118 = 0x152 # Insert
xkeymap.keycode.119 = 0x153 # Delete
xkeymap.keycode.110 = 0x147 # Home
xkeymap.keycode.115 = 0x14f # End
xkeymap.keycode.112 = 0x149 # Prior
xkeymap.keycode.117 = 0x151 # Next
xkeymap.keycode.78 = 0x46 # Scroll_Lock
Mouse issues
Sometimes you may have an offset between host’s and the guest’s mouse cursor position.
Using VMware Player in full-screen mode may allow to temporarily solve the issue.
For a more permanent fix, you need to define a fixed screen size in the virtual machine configuration.