
In this article:
Still with me? In this second part of the vmtools guided tour (read the first part first!), we will now enter in the core of the subject and learn how to manage virtual machines, and in particular how virtual machines forks and merges work.
As before, if anything seems unclear or would warrant more explanation, feel free to contact me.
Use vmcreate to create virtual machines
Create a virtual machine from an installation ISO image
vmup is useful to boot a virtual disk image, but it doesn’t save the virtual
machine settings and does not provide access to vmtools more advanced features.
In vmtools, a virtual machine is a standard directory gathering a few files. To create a new virtual machine, the most common way is to provide the path to the ISO image of an installation disk and the name of a new directory to create:
user@host:~$ vmcreate -d xubuntu-16.04-desktop-amd64.iso xubuntu-16.04
-----------------------------------------------------------------
Answer to the questions below to define the guest properties.
You can type '?' to display the help screen at any time.
-----------------------------------------------------------------

Number of vCPUs (default: 2)?

RAM size (default: 2G)?

Main hard-disk size (default: 40G)?
xubuntu-16.04: VM created.
user@host:~$
vmcreate accepts the same parameters as vmup, so we use -d to pass the
path to an ISO file.
Note
Use a device file such as /dev/cdrom to use the host’s physical CD/DVD ROM reader.
Also note that the questions asked now are slightly different: as we are creating a persistent virtual machine and did not provide any already existing virtual hard-disk image, vmtools proposes to automatically create one for us. Again, such behavior is entirely controlled by plugins and can be customized at will.
vmcreate automatically starts the virtual machine, add the -n flag if you
want to only create the virtual machine but not start it yet.
Virtual machines files
Let’s take a look to the files generated by this command::
user@host:~$ ls -lh xubuntu-16.04/
total 4.8G
-rw-r--r-- 1 user user 4.8G Sep 17 16:35 hdd.qcow2
srwxr-x--- 1 user user    0 Sep 17 16:35 monitor.sock
-rw------- 1 user user    5 Sep 17 16:35 qemu.pid
-rw-r--r-- 1 user user  696 Sep 17 16:24 vm.settings
user@host:~$
Next to the hard-disk image hdd.qcow2, the most important file is the vm.settings file which stores, as its name implies, the virtual machine settings. This file is a human-friendly plain text file:
############################################################
# Virtual machine configuration generated on:
# Sun Sep 17 16:24:10 CEST 2017
# by user
# initial creation
# See vm.settings(5) man page for available settings.
############################################################

### General ###

vm_name=xubuntu-16.04

### Storage ###

# HDD 1 - initial size: 40G
vm_storage_hdd1_backend=/home/user/xubuntu-16.04/hdd.qcow2
vm_storage_hdd1_enable=yes

# CD-ROM 1
# vm_storage_cdrom1_backend=/home/user/xubuntu-16.04-desktop-amd64.iso
vm_storage_cdrom1_enable=yes

### Misc settings ###

vm_networking_iface1_enable=yes
vm_networking_iface1_mac='52:54:00:a4:e4:0f'
The list of all possible settings is way longer, but this file only stores the non-default ones for clarity sake. The complete list is documented on vm.settings(5) man page.
Starting the virtual machine
The virtual machine can be started:
-
By providing its full path to the
vmupcommand:user@host:~$ vmup ~/xubuntu-16.04/ xubuntu-16.04: Virtual machine started. user@host:~$
-
Or by going inside the directory and running
vmupwith no path to boot (when no path is provided,vmupattempts to use the current directory as a vmtools virtual machine):user@host:~$ cd xubuntu-16.04/ user@host:~/xubuntu-16.04$ vmup xubuntu-16.04: Virtual machine started. user@host:~/xubuntu-16.04$
In either case we are not asked any setting anymore without having to resort
to the -y flag as we did in the first part.
All vmup features remain usable to add virtual hard-disk or CD/DVD ROM device,
boot the virtual machine in snapshot mode to not alter its hard-disk image, etc.
Create a virtual machine from a hard-disk image
Instead of creating a virtual machine from a blank hard-disk and an operating system installation disk, it is also possible to create a virtual machine around an already existing hard-disk image.
As with vmup, use the -c option to pass a path to a hard-disk image file:
user@host:~$ cd lamp-14.2/
user@host:~/lamp-14.2$ ls -lh
total 293M
-rw-r--r-- 1 user user 293M Jun  2 10:55 turnkey-lamp-14.2-jessie-amd64.ova
user@host:~/lamp-14.2$ vmcreate -c ./turnkey-lamp-14.2-jessie-amd64.ova  .
-----------------------------------------------------------------
Answer to the questions below to define the guest properties.
You can type '?' to display the help screen at any time.
-----------------------------------------------------------------

Number of vCPUs (default: 2)?

RAM size (default: 2G)?

Auto-conversion: /home/user/lamp-14.2/turnkey-lamp-14.2-jessie-amd64.ova
This file seems to be either a third-party or a legacy file, it is recommended to
convert it for regular usage.
Create a Qcow2 copy of this file [yN]? y
    (100.00/100%)
lamp-14.2: VM created.
user@host:~/lamp-14.2$ ls -lh
total 1.2G
srwxr-x--- 1 user user    0 Sep 17 18:13 monitor.sock
-rw------- 1 user user    5 Sep 17 18:13 qemu.pid
-rw-r--r-- 1 user user 293M Jun  2 10:55 turnkey-lamp-14.2-jessie-amd64.ova
-rw-r--r-- 1 user user 903M Sep 17 18:13 turnkey-lamp-14.2-jessie-amd64.qcow2
-rw-r--r-- 1 user user  563 Sep 17 18:13 vm.settings
user@host:~/lamp-14.2$
We just created a new vmtools virtual machine from an .ova file, vmtools still taking care of the conversion (the original .ova can be safely deleted if you don’t need anymore).
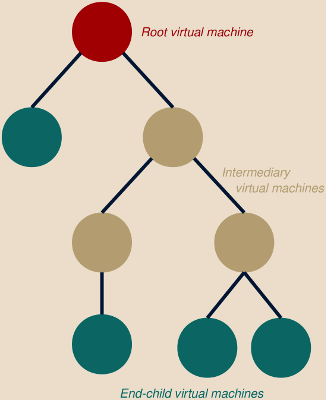
Virtual machines forking
vmtools allows to derive child virtual machines from parent ones in a recursive and unrestricted way. This feature relies on Qemu snapshot files, making the fork creation a very quick and space efficient operation.
 This opens the way to several workflows, including:
-
In a similar way as most source code repositories work1, you can now span a new “branch” of a virtual machine to qualify a new setting, update or software and merge it into the main virtual machine image only if you are satisfied with the result.
-
You can instantly span new virtual machines from a pre-installed, known, good copy to proceed with some quick tests without affecting the original image.
These tests images can also be forked (and so on in a recursive manner) for instance with the first fork used to setup an environment reproducing an issue and the following forks used to test various potential fixes.
-
You can maintain a library of master copies of clean guest environments at various update levels, with new tests and projects using the most up-to-date copy and older copies being merged when not used anymore.
Note
For one-shot tests, instead of manually creating a fork, doing your test
and then delete it, simply start your virtual machine in
snapshot (non-persistent) mode using the -s flag (vmup -s).
This achieves the same goal without the burden of manually handling the fork.
Use vmfork to fork
The vmfork command requires the path to a source virtual machine and one
or several new paths for the forks.
The example below creates a fork of the xubuntu-16.04 virtual machine:
user@host:~$ cd xubuntu-16.04/
user@host:~/xubuntu-16.04$ ls
hdd.qcow2  monitor.sock  qemu.pid  vm.settings
user@host:~/xubuntu-16.04$ vmfork . myfork
myfork: Forked from '/home/user/xubuntu-16.04'.
user@host:~/xubuntu-16.04$ ls -lh
total 4.8G
-rw-r--r-- 1 user user   37 Sep 19 18:26 childs.lst
-rw-r--r-- 1 user user 4.8G Sep 17 17:46 hdd.qcow2
srwxr-x--- 1 user user    0 Sep 19 17:38 monitor.sock
drwxr-xr-x 2 user user 4.0K Sep 19 18:26 myfork
-rw------- 1 user user    5 Sep 19 17:38 qemu.pid
-rw-r--r-- 1 user user  696 Sep 17 16:24 vm.settings
user@host:~/xubuntu-16.04$ ls -lh myfork/
total 200K
-rw-r--r-- 1 user user 193K Sep 19 18:26 hdd.qcow2
-rw-r--r-- 1 user user  566 Sep 19 18:26 vm.settings
user@host:~/xubuntu-16.04$
The process is very quick and, as you can see in the ls output, a newly
created child virtual machine weights only around 200 KB.
In fact, child virtual machines rely on their parent’s storage and settings and
only store the modified data locally.
Several forks of the same virtual machine can be created at once:
user@host:~/xubuntu-16.04$ vmfork myfork/ myfork/child_{1,2,3}
myfork/child_1: Forked from '/home/user/xubuntu-16.04/myfork'.
myfork/child_2: Forked from '/home/user/xubuntu-16.04/myfork'.
myfork/child_3: Forked from '/home/user/xubuntu-16.04/myfork'.
user@host:~/xubuntu-16.04$ ls -lh myfork/
total 216K
drwxr-xr-x 2 user user 4.0K Sep 19 18:32 child_1
drwxr-xr-x 2 user user 4.0K Sep 19 18:32 child_2
drwxr-xr-x 2 user user 4.0K Sep 19 18:32 child_3
-rw-r--r-- 1 user user  135 Sep 19 18:32 childs.lst
-rw-r--r-- 1 user user 193K Sep 19 18:26 hdd.qcow2
-rw-r--r-- 1 user user  566 Sep 19 18:26 vm.settings
user@host:~/xubuntu-16.04$
Note
The syntax {1,2,3} used in this example is not specific to
vmtools but relies on a parameter expansion syntaxt supported by most
interactive shells and particularly handy in such situations.
In these example the virtual machines have been created as subdirectories of their parents. This is usually a good practice to keep things clear and organized but this is not a requirement and you will often want to do things differently (for instance clean master guests and tests virtual machines will most likely be stored in different locations).
Booting a parent virtual machine
As we saw above, child virtual machines rely on their parent storage and store only modified data locally. Therefore, any modification of the parent storage will most likely invalidate child’s storage. Any action which would imply to modify the parent storage is therefore forbidden by vmtools.
Thus, trying to start a parent virtual machine fails:
user@host:~/xubuntu-16.04$ vmup
ERROR: This virtual machine has childs, its hard disk images cannot be modified.
Use the '-s' or '-r' command line flags to start it in snapshot or read-only mode.
Childs list:
    /home/user/xubuntu-16.04/myfork
xubuntu-16.04: ERROR: Failed to start the virtual machine.
user@host:~/xubuntu-16.04$
A solution is to start the virtual machine in snapshot mode, since enabling this mode prevents any modification to be saved and the disk image file is accessed read-only2:
user@host:~/xubuntu-16.04$ vmup -s
xubuntu-16.04: Virtual machine started.
user@host:~/xubuntu-16.04$
Alternatively, if you need to use the parent virtual machine and save changes
in a permanent manner, you can either create a new fork of this parent and
work on the new fork instead, or you can copy the parent virtual machine
outside of the hierarchy tree using the vmcp command (see below).
Inherited settings
Childs virtual machines inherit their settings from their parent. Changing a setting on a parent virtual machine propagates this changes to all its descendants who do not explicitly set it.
For instance, in the example above adding vm_ram=4G in the file
~/xubuntu-16.04/vm.settings allows to centrally3 increase to 4
gigabytes the amount of RAM allocated by each of the example1, example2 and
exemple3 virtual machines (and this change would in turn also be propagated
to their own childs and descendants).
Use vminfo to investigate
Virtual machines hierarchy, along with other properties, can be investigated as
part of the vminfo command output:
user@host:~/xubuntu-16.04$ vminfo
======================================================================
= /home/user/xubuntu-16.04
======================================================================

----------------------------------------------------------------------
- General information (-i)
----------------------------------------------------------------------

Name: xubuntu-16.04
State: not running

----------------------------------------------------------------------
- Hierarchy tree (-t)
----------------------------------------------------------------------

xubuntu-16.04  *
└─ myfork      -
   ├─ child_1  -
   ├─ child_2  -
   └─ child_3  -

(*: Current    R: Running    ?: Error)

----------------------------------------------------------------------
- Settings (-s)
----------------------------------------------------------------------

* Virtual machine settings:

    vm_networking_iface1_enable=yes
    vm_networking_iface1_mac='52:54:00:a4:e4:0f'
    vm_storage_cdrom1_enable=yes
    vm_storage_hdd1_backend=/home/user/xubuntu-16.04/hdd.qcow2
    vm_storage_hdd1_enable=yes

----------------------------------------------------------------------
- Storage backend (-b)
----------------------------------------------------------------------

* HDD 1: /home/user/xubuntu-16.04/hdd.qcow2

QEMU QCOW Image (v3), 42949672960 bytes

* CD-ROM 1: Drive enabled, but no backend file selected.

user@host:~/xubuntu-16.04$
Adding the -t flag limits the output to the hierarchy information, and the
-l flag enables long output which, in the case the virtual machine hierarchy,
outputs the location of each virtual machine:
user@host:~/xubuntu-16.04$ vminfo -tl
======================================================================
= /home/user/xubuntu-16.04
======================================================================

----------------------------------------------------------------------
- Hierarchy tree (-t)
----------------------------------------------------------------------

xubuntu-16.04  *  /home/user/xubuntu-16.04
└─ myfork      -  /home/user/xubuntu-16.04/myfork
   ├─ child_1  -  /home/user/xubuntu-16.04/myfork/child_1
   ├─ child_2  -  /home/user/xubuntu-16.04/myfork/child_2
   └─ child_3  -  /home/user/xubuntu-16.04/myfork/child_3

(*: Current    R: Running    ?: Error)

user@host:~/xubuntu-16.04$
This allows to get a bird’s eye view of all the virtual machines composing a hierarchy, their location and their status.
More information is available on vminfo(1) man page.
Use vmmerge to merge
The vmmerge command allows to merge a child and a parent virtual machine, the
direction of the merge can be controlled using the optional -p and -c flags:
-p(default): Merges the given virtual machine into its parent.-c: Merges a given virtual machine into its child(s).
Default (parent) merge
By default vmmerge merges the given virtual machine into its parent:
user@host:~/xubuntu-16.04$ vmmerge myfork/
myfork/: Merged.
user@host:~/xubuntu-16.04$ vminfo -tl
======================================================================
= /home/user/xubuntu-16.04
======================================================================

----------------------------------------------------------------------
- Hierarchy tree (-t)
----------------------------------------------------------------------

xubuntu-16.04  *  /home/user/xubuntu-16.04
├─ child_1     -  /home/user/xubuntu-16.04/child_1
├─ child_2     -  /home/user/xubuntu-16.04/child_2
└─ child_3     -  /home/user/xubuntu-16.04/child_3

(*: Current    R: Running    ?: Error)
In the example above, the content and settings of the virtual machine myfork have been merged into the parent virtual machine xubuntu-16.04. All child virtual machines have been relinked to their new parent, and in the last column we can notice that the virtual machines which were stored below myfork home directory have been moved to reflect the updated hierarchy.
Note
You can merge a virtual machine to its parent only if it is its only child. In the example above, you cannot do a parent-merge on the child_* virtual machines as this would break the parent-child inherited storage and settings of the other childs.
Reverse (child) merge, example of a master repository
Sometime you need the merge to work in the opposite direction and merge a virtual machine into its child.
Here is a example on how a repository of master copies of virtual machines guests may look like:
user@host:~$ cd masters/Windows-7/
user@host:~/masters/Windows-7$ ls -lh
total 23G
drwxr-xr-x 2 user user 4.0K Mar 21  2015 20150321
drwxr-xr-x 2 user user 4.0K Jun 19  2016 20160619
drwxr-xr-x 2 user user 4.0K Jul 23 16:42 20170723
drwxr-xr-x 2 user user 4.0K Aug 26 17:26 20170826
drwxr-xr-x 2 user user 4.0K Sep 20 17:46 20170920
-rw-r--r-- 1 user user   35 Sep 21 17:51 childs.lst
-rw-r--r-- 1 user user  23G Mar 21  2015 hdd.qcow2
lrwxrwxrwx 1 user user    9 Sep 20 17:46 latest -> 20170920/
srwxr-x--- 1 user user    0 Mar 21  2015 monitor.sock
-rw------- 1 user user    6 Mar 21  2015 qemu.pid
-rw-r--r-- 1 user user  534 Mar 21  2015 vm.settings
user@host:~/masters/Windows-7$
Each timestamp correspond to an updated version of the main Windows-7 virtual machine.
Note
Notice the latest symbolic link which point to the most recent virtual machine.
This makes forking from the most up-to-date image easier by simply having to fork from ~/masters/Windows-7/latest instead of having to spell-out the full timestamp. vmtools resolves the symbolic internally and forks from the actual virtual machine directory, so the symbolic can be modified at a later date without impacting any previously forked virtual machines.
These master images serve as base image and are forked for various purposes and to various locations:
user@host:~/masters/Windows-7$ vminfo -tl
======================================================================
= /home/user/masters/Windows-7
======================================================================

----------------------------------------------------------------------
- Hierarchy tree (-t)
----------------------------------------------------------------------

Windows-7                *  /home/user/masters/Windows-7
└─ 20150321              -  /home/user/masters/Windows-7/20150321
   ├─ 20160619           -  /home/user/masters/Windows-7/20160619
   │  ├─ 20170723        -  /home/user/masters/Windows-7/20170723
   │  │  └─ 20170826     -  /home/user/masters/Windows-7/20170826
   │  │     ├─ 20170920  -  /home/user/masters/Windows-7/20170920
   │  │     ├─ GNS3      -  /home/user/networking/GNS3
   │  │     └─ misc      -  /home/user/Documents/VMs/misc
   │  └─ training        -  /home/user/Documents/VMs/training
   ├─ IE10               -  /home/user/QA/IE10
   │  └─ Cisco           -  /home/user/networking/Cisco
   ├─ IE8                -  /home/user/QA/IE8
   └─ IE9                -  /home/user/QA/IE9

(*: Current    R: Running    ?: Error)

user@host:~/masters/Windows-7$
We can see that the image 20170723 isn’t used anymore, we can therefore get rid of it by merging it into its child 20170826:
user@host:~/masters/Windows-7$ vmmerge -c 20170723
20170723: Merged.
user@host:~/masters/Windows-7$ vminfo -tl
======================================================================
= /home/user/masters/Windows-7
======================================================================

----------------------------------------------------------------------
- Hierarchy tree (-t)
----------------------------------------------------------------------

Windows-7             *  /home/user/masters/Windows-7
└─ 20150321           -  /home/user/masters/Windows-7/20150321
   ├─ 20160619        -  /home/user/masters/Windows-7/20160619
   │  ├─ 20170826     -  /home/user/masters/Windows-7/20170826
   │  │  ├─ 20170920  -  /home/user/masters/Windows-7/20170920
   │  │  ├─ GNS3      -  /home/user/networking/GNS3
   │  │  └─ misc      -  /home/user/Documents/VMs/misc
   │  └─ training     -  /home/user/Documents/VMs/training
   ├─ IE10            -  /home/user/QA/IE10
   │  └─ Cisco        -  /home/user/networking/Cisco
   ├─ IE8             -  /home/user/QA/IE8
   └─ IE9             -  /home/user/QA/IE9

(*: Current    R: Running    ?: Error)

user@host:~/masters/Windows-7$
Note
Unlike parent-merge, it is possible to child-merge a virtual machine which has several child: the content and settings of this virtual machine will be merged into each child.
Move, rename, copy and delete
You must use vmtools commands to move, rename copy and delete vmtools virtual machines. This is necessary to keep the virtual machines hierarchy tree valid.
Use vmmv to move and rename
The vmmv command allows to move and rename a virtual machine home directory:
user@host:~/xubuntu-16.04$ vmmv child_1 first
child_1: Virtual machine moved to 'first'.
user@host:~/xubuntu-16.04$ ls -lh
total 4.8G
drwxr-xr-x 2 user user 4.0K Sep 19 18:32 child_2
drwxr-xr-x 2 user user 4.0K Sep 19 18:32 child_3
-rw-r--r-- 1 user user   37 Sep 19 18:26 childs.lst
drwxr-xr-x 2 user user 4.0K Sep 19 18:32 first
-rw-r--r-- 1 user user 4.8G Sep 17 17:46 hdd.qcow2
srwxr-x--- 1 user user    0 Sep 19 17:38 monitor.sock
drwxr-xr-x 2 user user 4.0K Sep 19 18:26 myfork
-rw------- 1 user user    5 Sep 19 17:38 qemu.pid
-rw-r--r-- 1 user user  696 Sep 17 16:24 vm.settings
user@host:~/xubuntu-16.04$
Note
vmmv will not change the name of the virtual machine itself.
To change it, simply edit the value of vm_name in the vm.settings file.
Use vmcp to copy
The vmcp command allows to copy a virtual machine.
If the source virtual machine had a parent, the copied virtual will share
the same parent.
To avoid this behavior and create an autonomous copy of the source virtual
machine with no link to any parent, add the -a flag to the vmcp command.
To recursively copy a virtual machine tree, respecting childs’ relative
position, add the -r command to the vmcp command.
See vmcp(1) man page for more information on this command.
Use vmrm to delete
Use vmrm to delete a virtual machine.
It is particularly important to avoid using system’s rm command to delete
a virtual machine as this command does not provide the proper safeguards.
Warning
Keep in mind that deleting a virtual machine or its storage file not only causes the lost of the deleted virtual machine, but also invalidates all its descendants.
This is a frequent cause of accidents for newcomers in the Qemu world.
vmrm refuses to delete a virtual machine with childs unless the -r flag has
been provided, even if the -y flag has been enabled:
user@host:~$ vmrm -y xubuntu-16.04/
ERROR: /home/user/xubuntu-16.04: This directory cannot be modifed as it contains
a virtual machine with childs:
    /home/user/xubuntu-16.04/child_2
    /home/user/xubuntu-16.04/child_3
    /home/user/xubuntu-16.04/first
Use 'vmrm -r' to delete a virtual machine recursively.
user@host:~$
Use vmfix to fix common issues
Most common issues when using vmtools can be solved by using vmfix.
This includes:
-
Repairing broken parent-child links and storage image file links. Such issue usually happen when system’s
mvorcpcommand has been used instead of their vmtools counterpart. When this happens, it may be needed to applyvmfixon both the child and the parent virtual machine to fully restore the link. -
Deleting lingering lock files and backup data. This should not happen under normal circumstances but may be a conequence of a crash or a bug4 in vmtools.
-
vmfixcan also remove vmtools work files (Qemu PID and socket file): this is mostly cosmetic as the presence of these files is normal but you may want to remove them for instance to clean a virtual machine directory tree before sharing it with other people.
The -a flag tells vmfix to solve all defects issues (the two first bullets),
and the -r flag tells vmfix to recurse over a virtual machine tree and
directory.
Solving an issue with vmfix can be as simple as launching vmfix -ra from
the root virtual machine:
user@host:~/xubuntu-16.04$ mv child_2 second   # Don't do this! 'vmmv' should be used instead!
user@host:~/xubuntu-16.04$ vmfix -ra
WARNING: /home/user/xubuntu-16.04/childs.lst: This file references some childs which don't
seem to exist anymore:
    /home/user/xubuntu-16.04/child_2
Use 'vmfix -p' to unregister them.
SOLVED: /home/user/xubuntu-16.04: Child unregistered: '/home/user/xubuntu-16.04/child_2'.
WARNING: /home/user/xubuntu-16.04: Child link missing: '/home/user/xubuntu-16.04/second'.
SOLVED: /home/user/xubuntu-16.04: Child link added: '/home/user/xubuntu-16.04/second'.
WARNING: /home/user/xubuntu-16.04/second: vm_storage_hdd1_backend: Storage image file not
found or not readable: '/home/user/xubuntu-16.04/child_2/hdd.qcow2'.
SOLVED: /home/user/xubuntu-16.04/second: vm_storage_hdd1_backend: Storage image file set
to '/home/user/xubuntu-16.04/second/hdd.qcow2'.
/home/user/xubuntu-16.04/second: Settings updated.
user@host:~/xubuntu-16.04$
In the example above I “inadvertently” renamed the child_2 virtual machine
directory using system’s mv command instead of using vmmv.
vmfix automatically detected and fixed all the issues caused by this wrong manipulation.
Note
vmfix attempts to fix detected issues only when the solution seems
unambiguous.
It doesn’t attempt to fix dubious situations as blindly applying
the wrong fix could irremediably corrupt the virtual machines.
Check vmfix(1) man page for more information on vmfix and some
guidance on how to manually solve more troublesome issues.
Warning
vmfix has not the power to resurrect deleted virtual machines from the
dead, the only way to do this is by restoring a backup.
You have backups, don’t you?
Conclusion
Well done, you have now reached the end of the vmtools tour :) !
This post, along with the first part, covers most of what you need to know to get started. The sequel really depends on what you want to do with this tool.
While general use-cases were briefly covered during this tour to give you some inspiration on how to manage your virtual machines, more detailed and specific use-cases will follow as the need comes5.
Don’t forget to follow the vmtools page to get the latest news about this project.
-
It is only possible to merge a child and its parent, vmtools operates at a too low layer to allow to merge several branches together. ↩
-
To be accurate, the Qemu Monitor shell offers the
commitcommand which allows to force Qemu to commit writes even to files accessed in snapshot mode. This is usually not a problem, but you may need to take this into account when working on sensitive projects. ↩ -
It is also possible to centrally update the settings of virtual machines which are otherwise unrelated by using custom templates to gather those virtual machines into logical groups. See vmtools(7) for more information. ↩
-
If you encountered a bug when using vmtools, don’t forget to notify me about it by creating a new issue. ↩
-
Do you have a specific request or would-like a more detailed guide on some particular setup? Feel free to ask me. ↩